> ## Documentation Index
> Fetch the complete documentation index at: https://docs.fusioncore.us/llms.txt
> Use this file to discover all available pages before exploring further.
# Stripe Connected Account Link
> Create a Stripe connected account, send the one-time onboarding link, and walk the client through completing Stripe onboarding and webhook setup.
## Overview
**Stripe** is the payment processor that fusionCore uses to charge cards and bank accounts.
In the default setup, fusionCore uses one central **platform Stripe account**, and each organization you onboard becomes a **connected account** beneath it. A connected account is a separate Stripe account that the platform account can create payments for on the organization's behalf.
This page covers two parts of onboarding:
* How you (the vendor) create the connected account and send the client a **one-time onboarding link**.
* How the client uses that link to finish Stripe onboarding, configure payment methods, and set up webhooks — see [Stripe Connected Account Set-Up Guide](#stripe-connected-account-set-up-guide).
If you are configuring a test connected account, the steps are the same — just make sure you are in **Test Mode** in Stripe.
## Prerequisites
* Access to the central **fusionCore Stripe account** (the platform account, not the client's own Stripe account).
* The **country** of the company you are setting up.
## Create the Connected Account and Send the Link
Log into the central **fusionCore Stripe account**.
From **Home**, navigate to **Connected Accounts** and click **Create**.
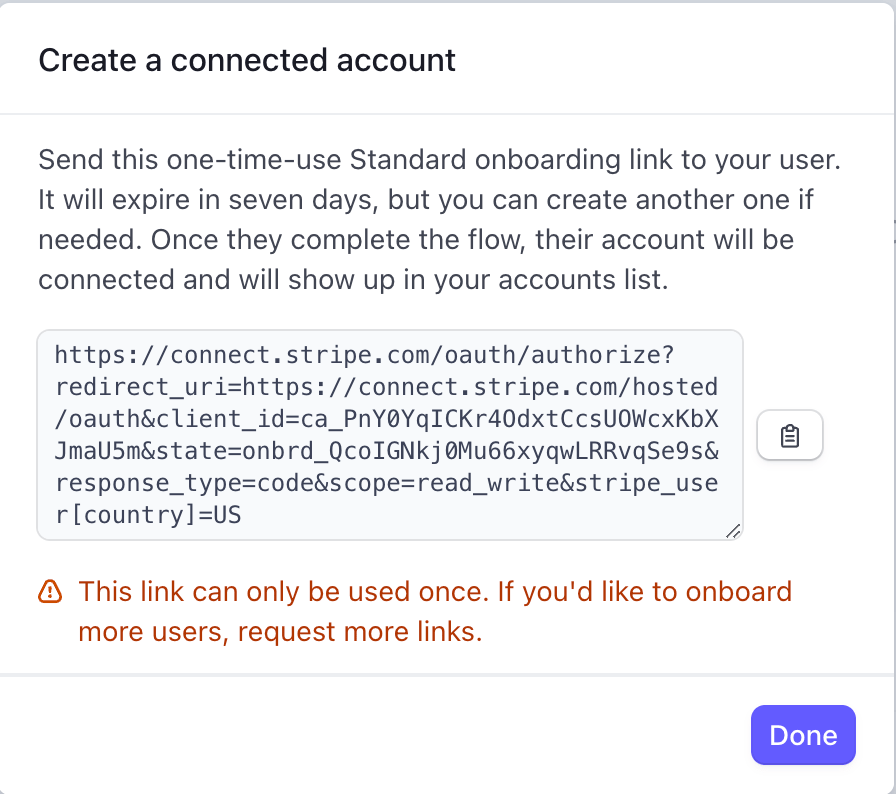
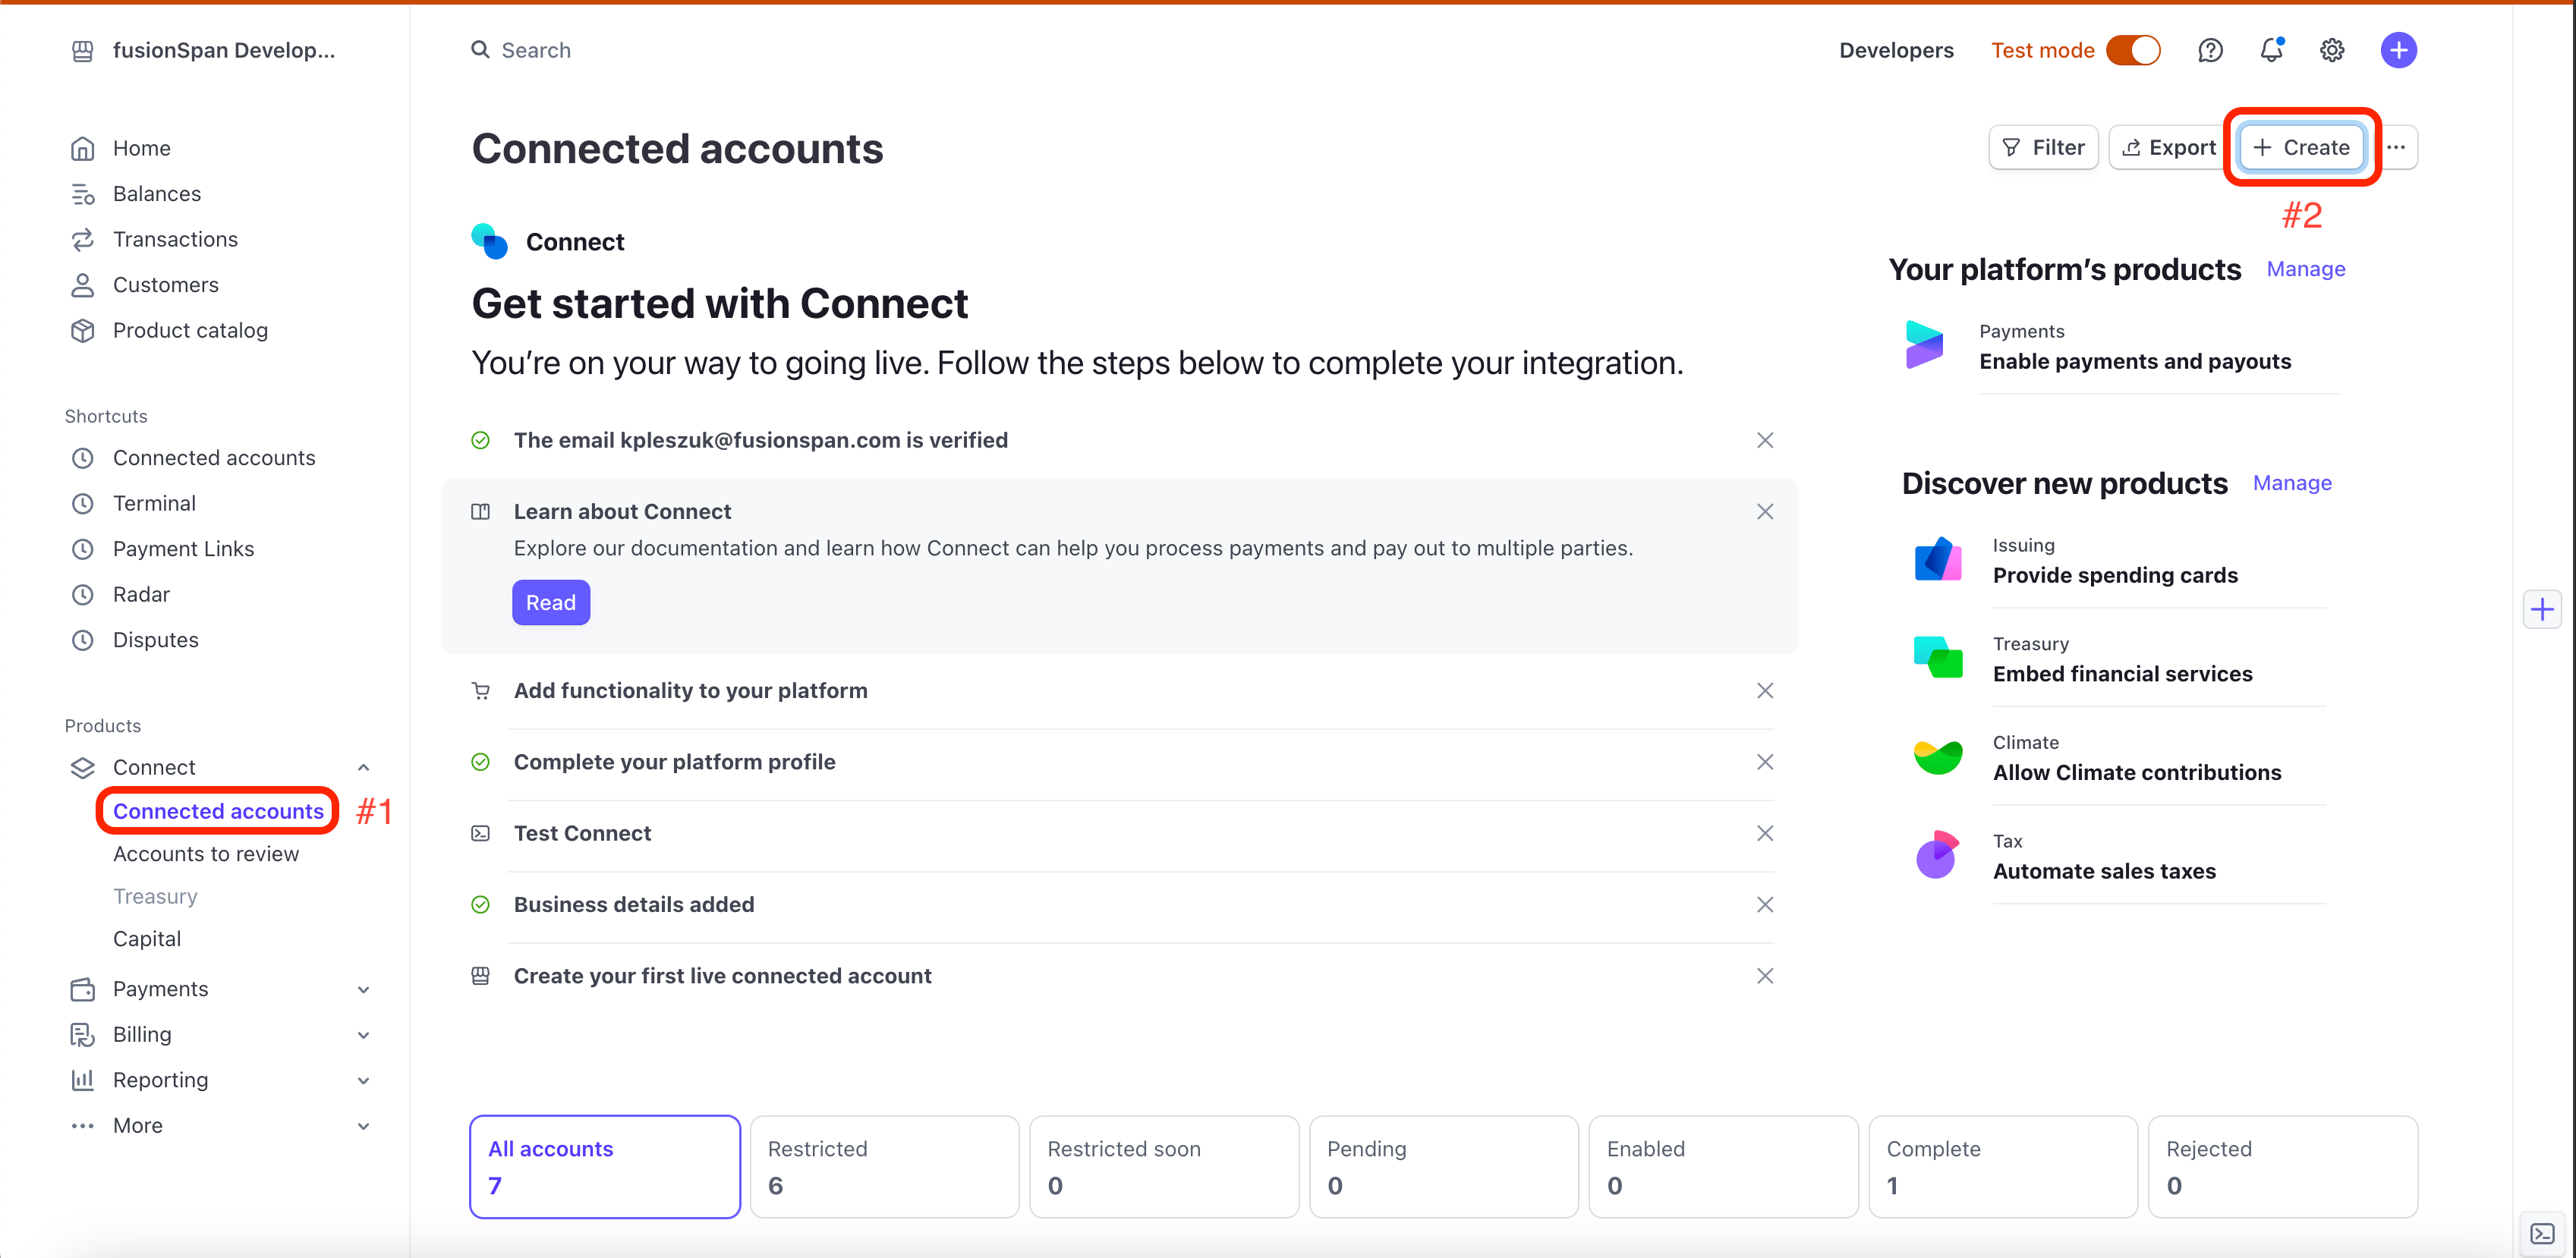 Set the **Account Type** and **Country**:
* For **Account Type**, choose **Standard**.
* For **Country**, choose the country of the company you are creating the account for. This is most often the United States.
Click **Continue**.
Set the **Account Type** and **Country**:
* For **Account Type**, choose **Standard**.
* For **Country**, choose the country of the company you are creating the account for. This is most often the United States.
Click **Continue**.
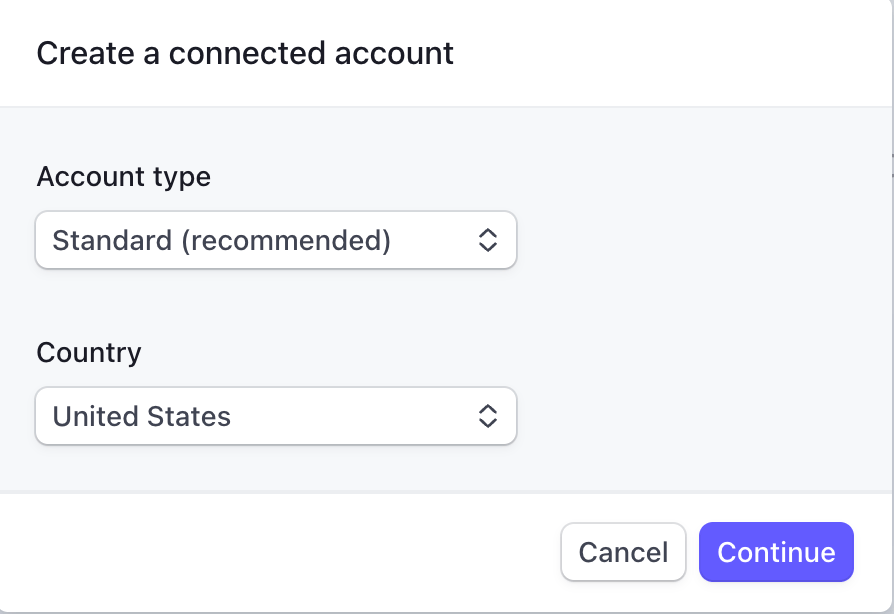 Copy the **one-time onboarding link** using the clipboard icon and send it to the client you are setting up.
* If you are the client, follow the [Stripe Connected Account Set-Up Guide](#stripe-connected-account-set-up-guide) below.
* If you are the vendor, send the link and let the client follow the [Stripe Connected Account Set-Up Guide](#stripe-connected-account-set-up-guide) below.
Copy the **one-time onboarding link** using the clipboard icon and send it to the client you are setting up.
* If you are the client, follow the [Stripe Connected Account Set-Up Guide](#stripe-connected-account-set-up-guide) below.
* If you are the vendor, send the link and let the client follow the [Stripe Connected Account Set-Up Guide](#stripe-connected-account-set-up-guide) below.
 ## Stripe Connected Account Set-Up Guide
This section is the client-facing walkthrough for completing your Stripe account and connecting it to fusionCore. **Stripe** is the payment processor that actually charges cards and bank accounts when someone pays on an order. **fusionCore** runs inside **Salesforce**, the CRM that stores your orders, members, and payments. To link the two, you complete Stripe's onboarding, then set up **webhooks** — URLs that Stripe calls to push payment events (a payment succeeded, a refund posted) back into Salesforce automatically.
The fusionCore implementation team normally drives this process with you. Your part is to complete Stripe onboarding, set up the webhooks, and hand the resulting signing secrets back to the team.
### Before You Start
Gather the following data points before you open the onboarding link. Having everything ready lets you finish Stripe onboarding in a single sitting.
#### Business Data Points
Information about the business itself.
* Country
* Business type
* Legal business name
* Business name (optional)
* Employer identification number (EIN)
* Registered business address (street, apt/unit/other, state/province, ZIP code)
* Business phone number
* Industry
* Business website
* Product description
#### Business Representative Info
Information about the person representing the business.
* Legal name
* Email address
* Job title
* Date of birth
* Home address (street, apt/unit/other, state/province, ZIP code)
* Phone number
* Last 4 digits of SSN
#### Public Details
Details that are visible to your customers.
* Statement descriptor
* Shortened descriptor
* Customer support phone number
* Customer support address
#### Bank Info
Details for your financial institution.
* Institution name
* Account number
* Routing number
### How Stripe Fits In
Stripe is an online payment processing platform that lets your organization accept payments, manage subscriptions, and run financial operations. It connects customer interactions to financial transactions, so payment workflows — donations, membership renewals, ticket sales, e-commerce purchases — are secure, trackable, and recorded in your CRM. With Stripe linked to fusionCore, payments process in real time, receipts go out automatically, and transaction details flow into Salesforce.
### Set Up Your Stripe Account
Click the **link sent to you by the fusionCore** implementation team.
## Stripe Connected Account Set-Up Guide
This section is the client-facing walkthrough for completing your Stripe account and connecting it to fusionCore. **Stripe** is the payment processor that actually charges cards and bank accounts when someone pays on an order. **fusionCore** runs inside **Salesforce**, the CRM that stores your orders, members, and payments. To link the two, you complete Stripe's onboarding, then set up **webhooks** — URLs that Stripe calls to push payment events (a payment succeeded, a refund posted) back into Salesforce automatically.
The fusionCore implementation team normally drives this process with you. Your part is to complete Stripe onboarding, set up the webhooks, and hand the resulting signing secrets back to the team.
### Before You Start
Gather the following data points before you open the onboarding link. Having everything ready lets you finish Stripe onboarding in a single sitting.
#### Business Data Points
Information about the business itself.
* Country
* Business type
* Legal business name
* Business name (optional)
* Employer identification number (EIN)
* Registered business address (street, apt/unit/other, state/province, ZIP code)
* Business phone number
* Industry
* Business website
* Product description
#### Business Representative Info
Information about the person representing the business.
* Legal name
* Email address
* Job title
* Date of birth
* Home address (street, apt/unit/other, state/province, ZIP code)
* Phone number
* Last 4 digits of SSN
#### Public Details
Details that are visible to your customers.
* Statement descriptor
* Shortened descriptor
* Customer support phone number
* Customer support address
#### Bank Info
Details for your financial institution.
* Institution name
* Account number
* Routing number
### How Stripe Fits In
Stripe is an online payment processing platform that lets your organization accept payments, manage subscriptions, and run financial operations. It connects customer interactions to financial transactions, so payment workflows — donations, membership renewals, ticket sales, e-commerce purchases — are secure, trackable, and recorded in your CRM. With Stripe linked to fusionCore, payments process in real time, receipts go out automatically, and transaction details flow into Salesforce.
### Set Up Your Stripe Account
Click the **link sent to you by the fusionCore** implementation team.
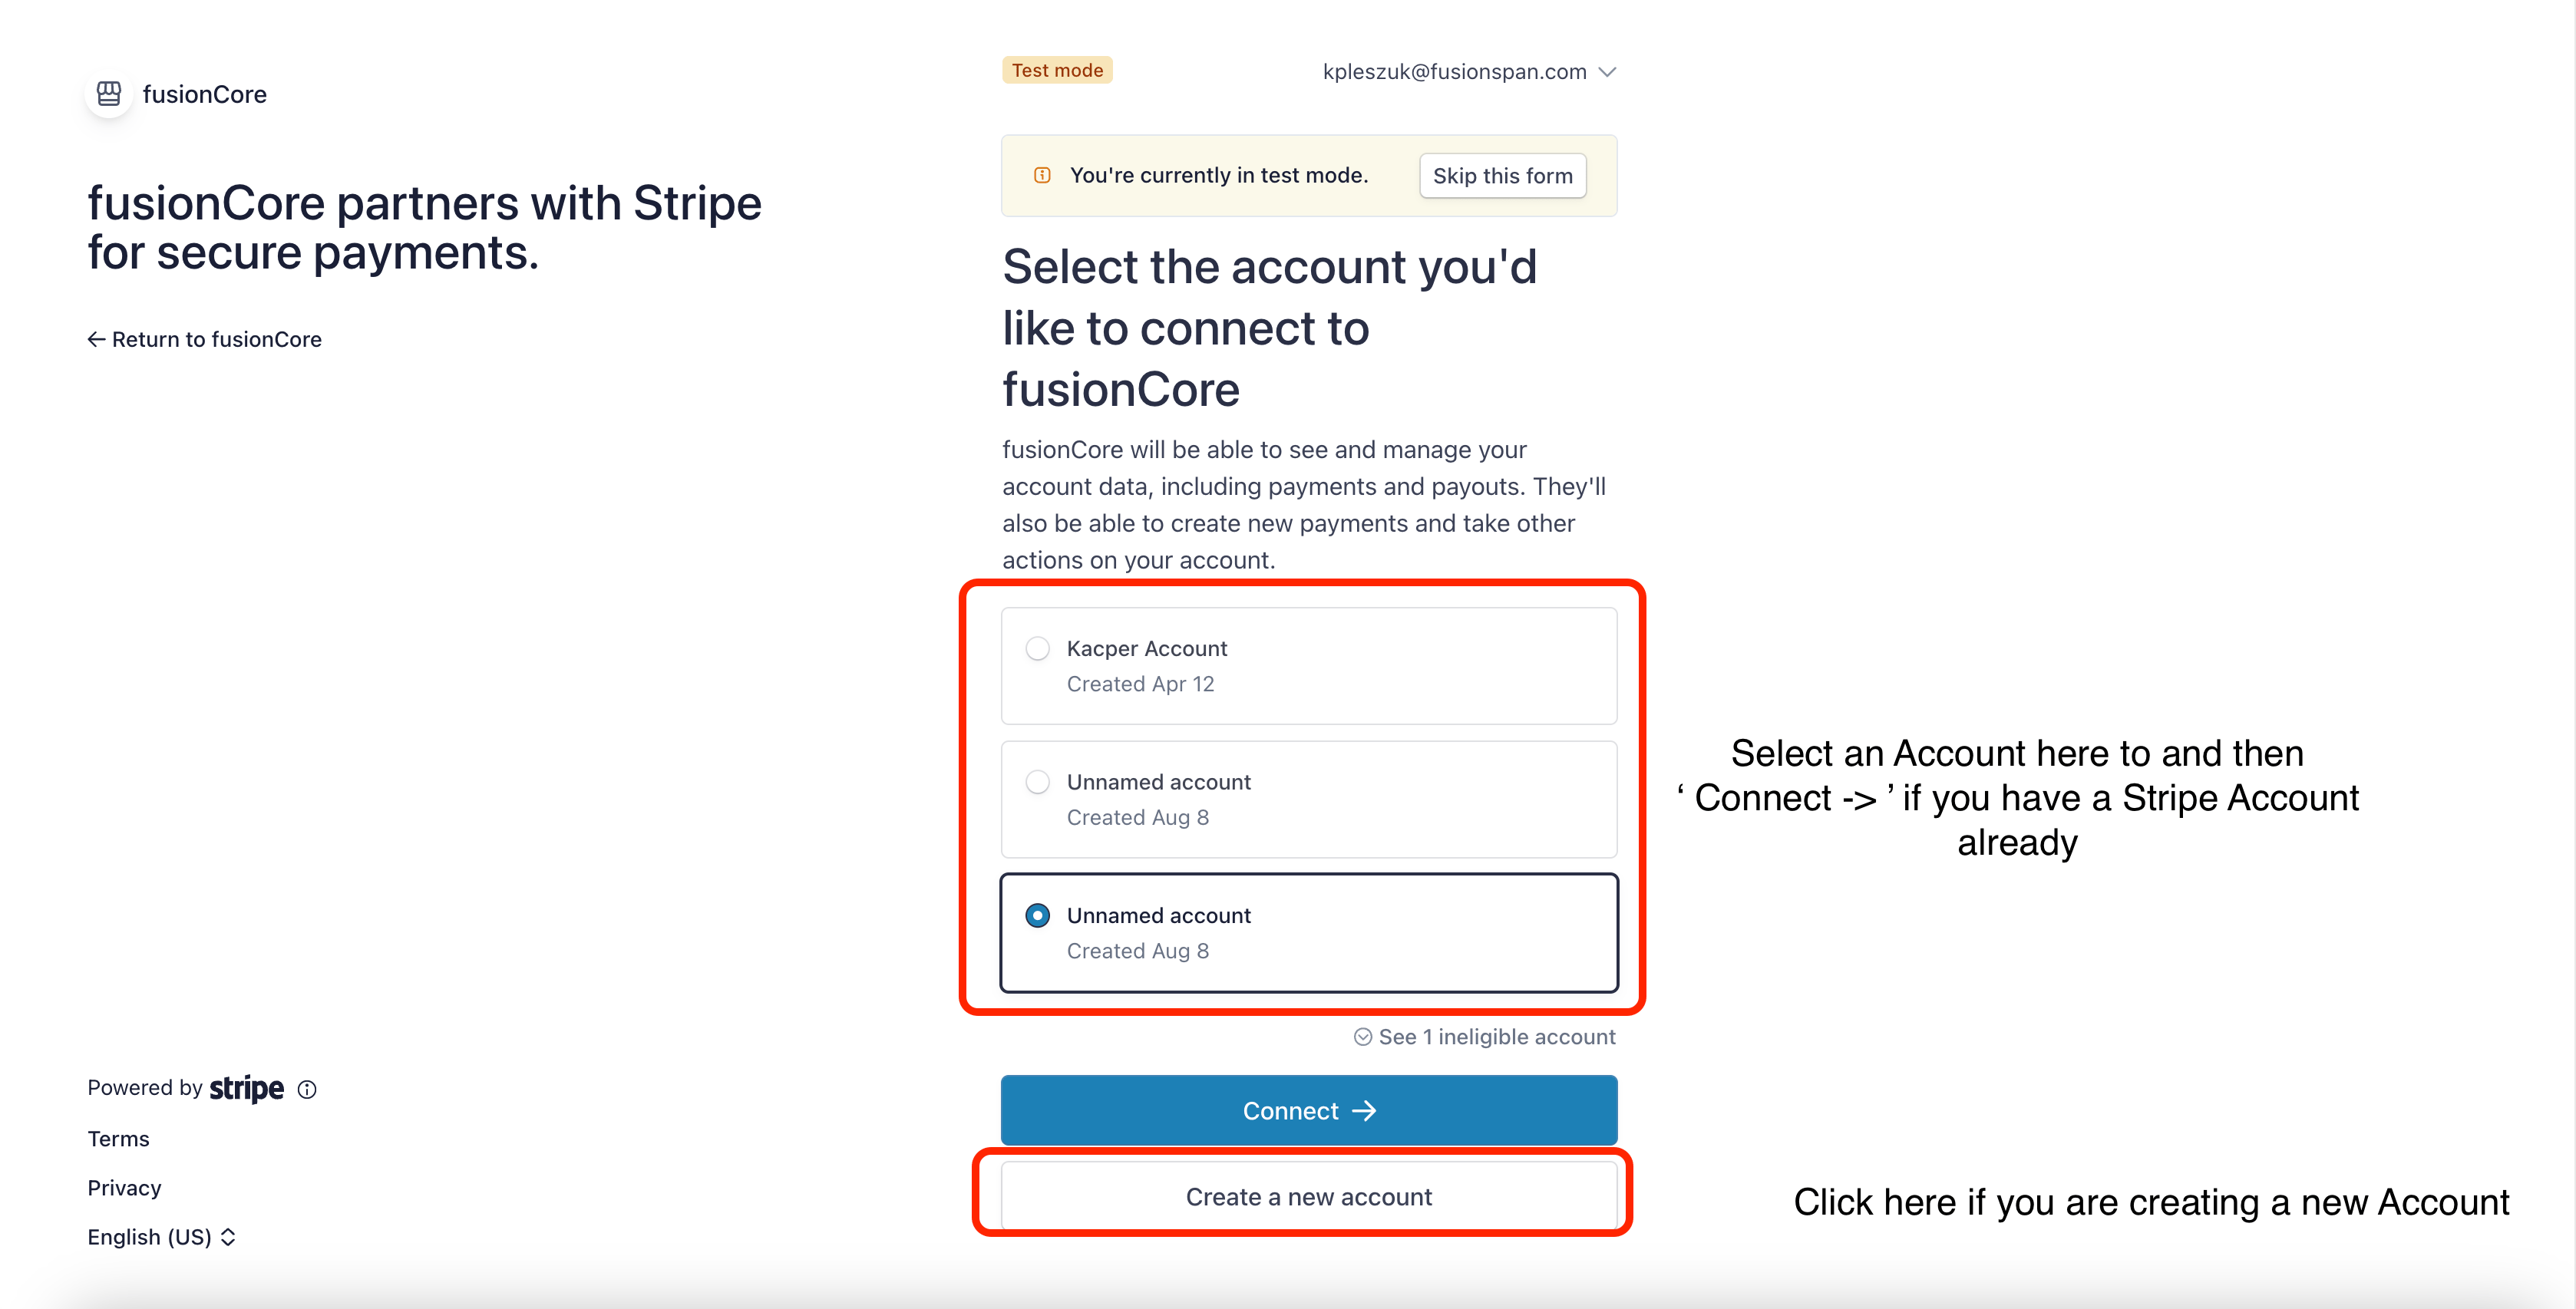 On the **fusionCore Connect** page, choose one:
* Create a new account on Stripe.
* Select your pre-existing Stripe account to connect to fusionCore. If you have a pre-existing account, skip ahead to completing the Stripe information section.
If you have a pre-existing Stripe account, log into Stripe in your browser before you click the link from the implementation team, so that you are signed in automatically.
Complete the **Stripe information** section, which covers personal, professional, public, and financial institution information. Use the data points you gathered in [Before You Start](#before-you-start).
If you are creating a new account, Stripe asks an additional step about your business type and location.
On the **fusionCore Connect** page, choose one:
* Create a new account on Stripe.
* Select your pre-existing Stripe account to connect to fusionCore. If you have a pre-existing account, skip ahead to completing the Stripe information section.
If you have a pre-existing Stripe account, log into Stripe in your browser before you click the link from the implementation team, so that you are signed in automatically.
Complete the **Stripe information** section, which covers personal, professional, public, and financial institution information. Use the data points you gathered in [Before You Start](#before-you-start).
If you are creating a new account, Stripe asks an additional step about your business type and location.
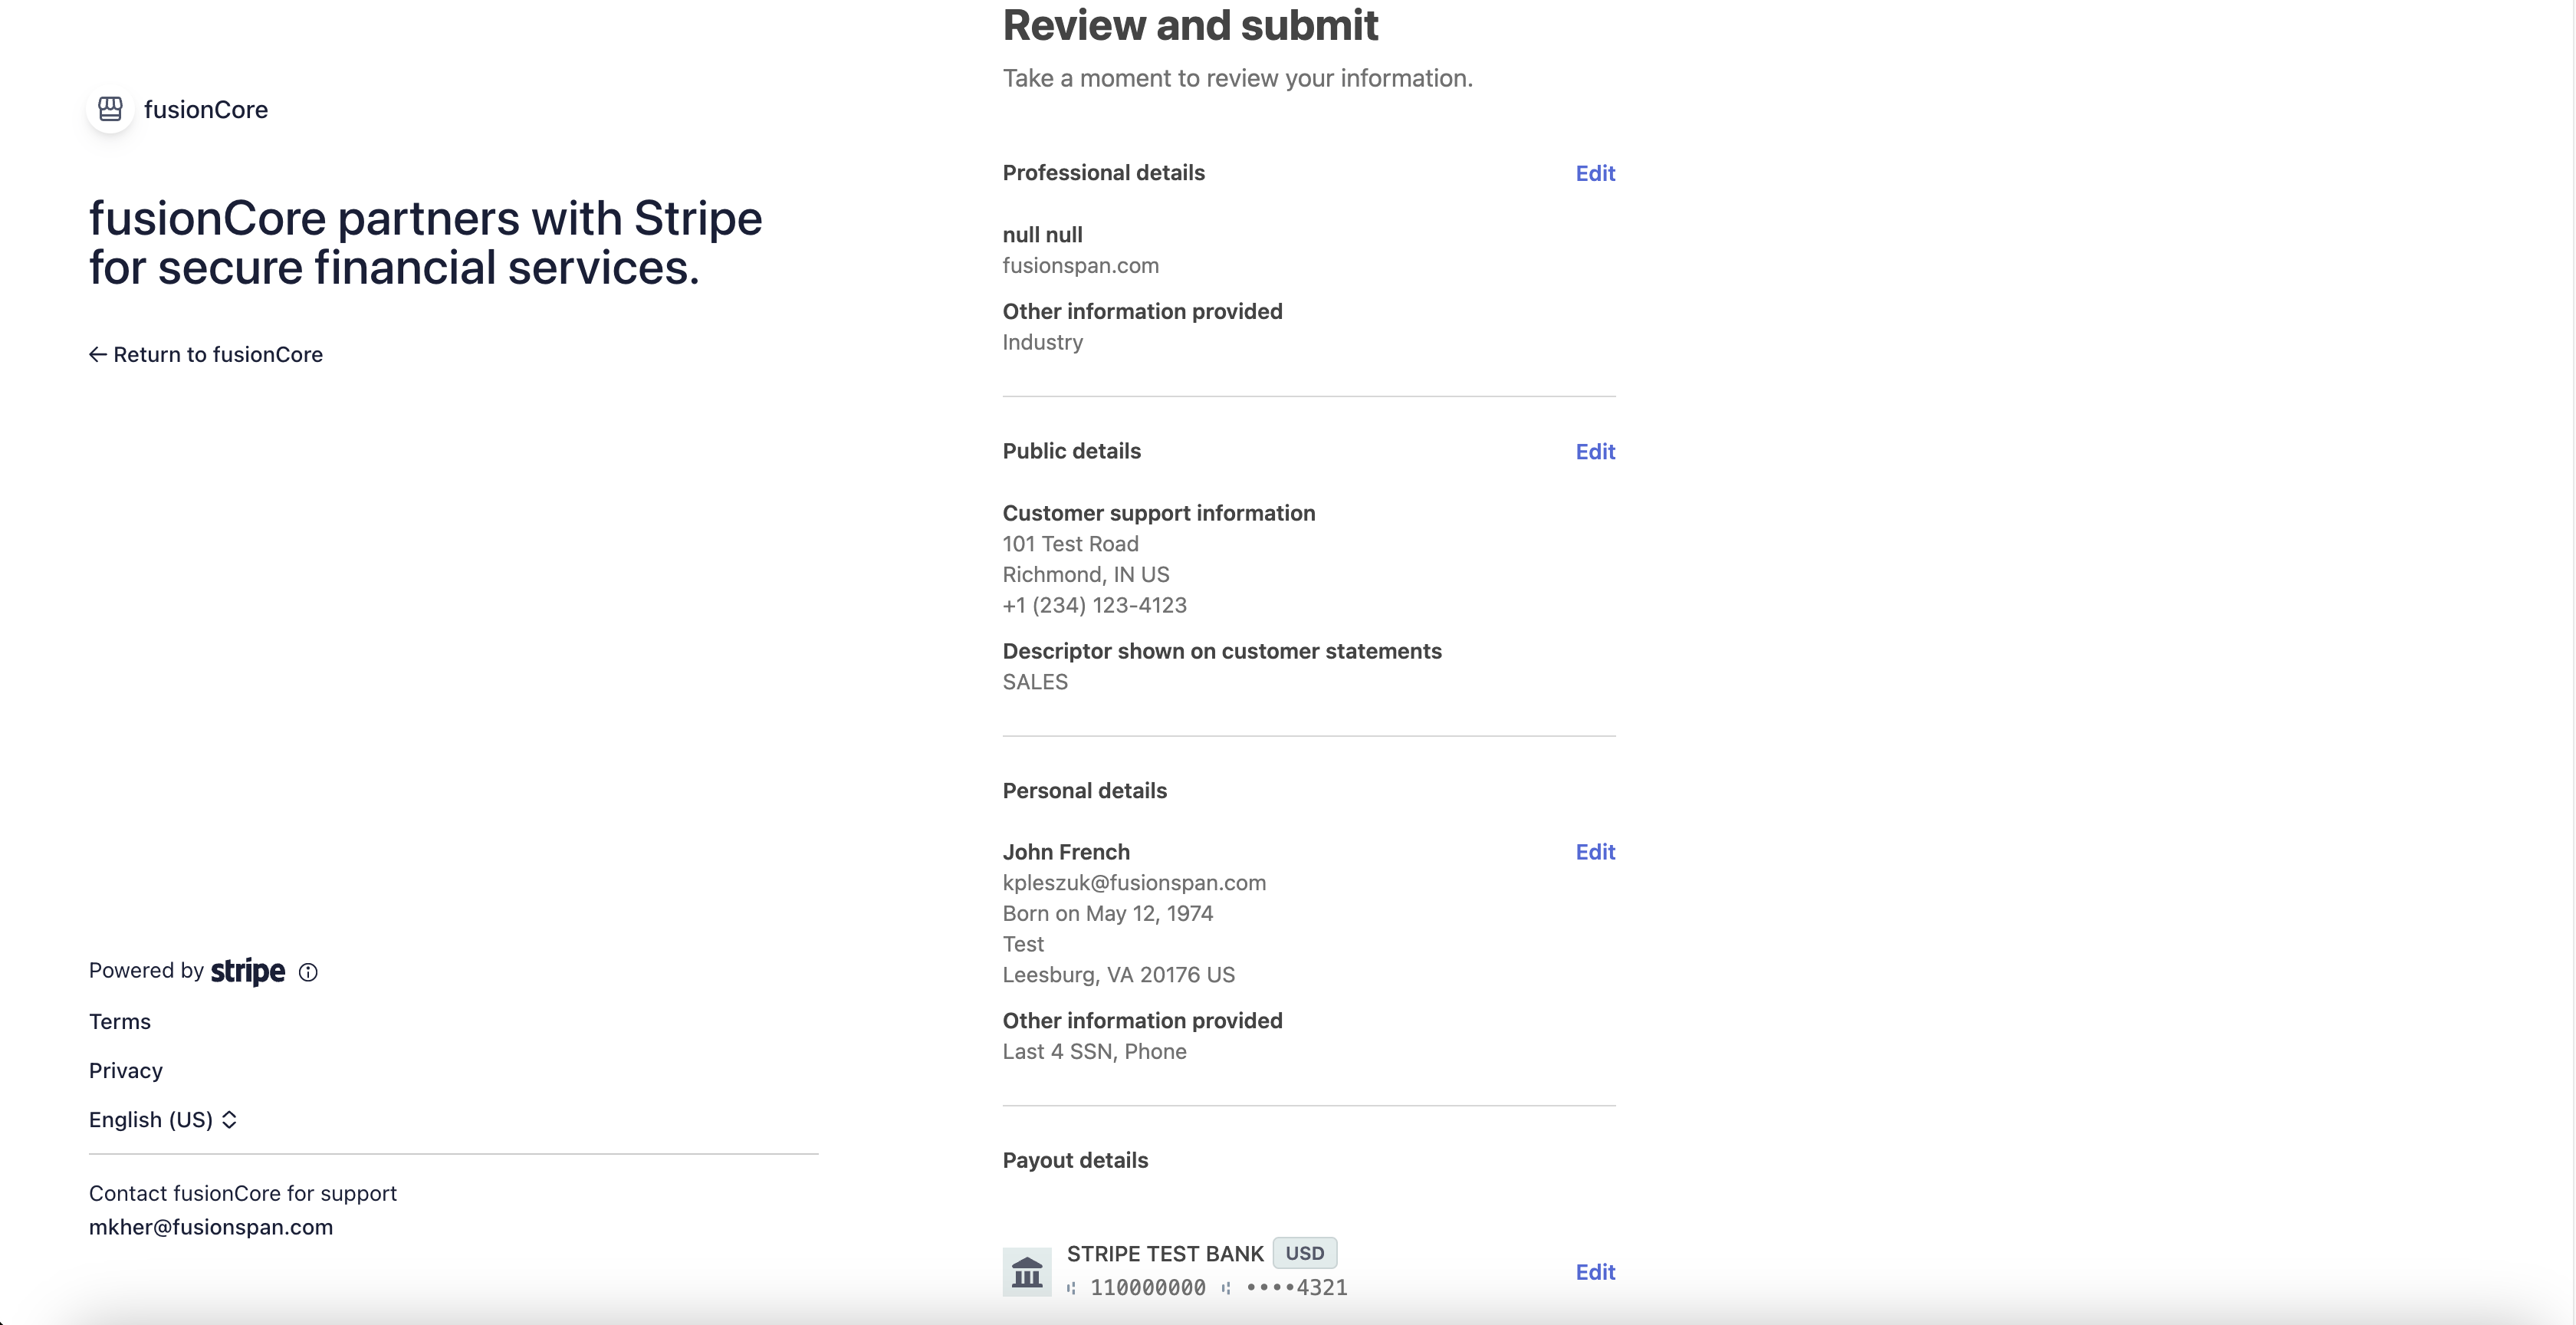 Once all sections are complete, click **Submit** to finish onboarding.
### Configure Your Payment Methods
After your account is onboarded, configure the payment methods you want to accept.
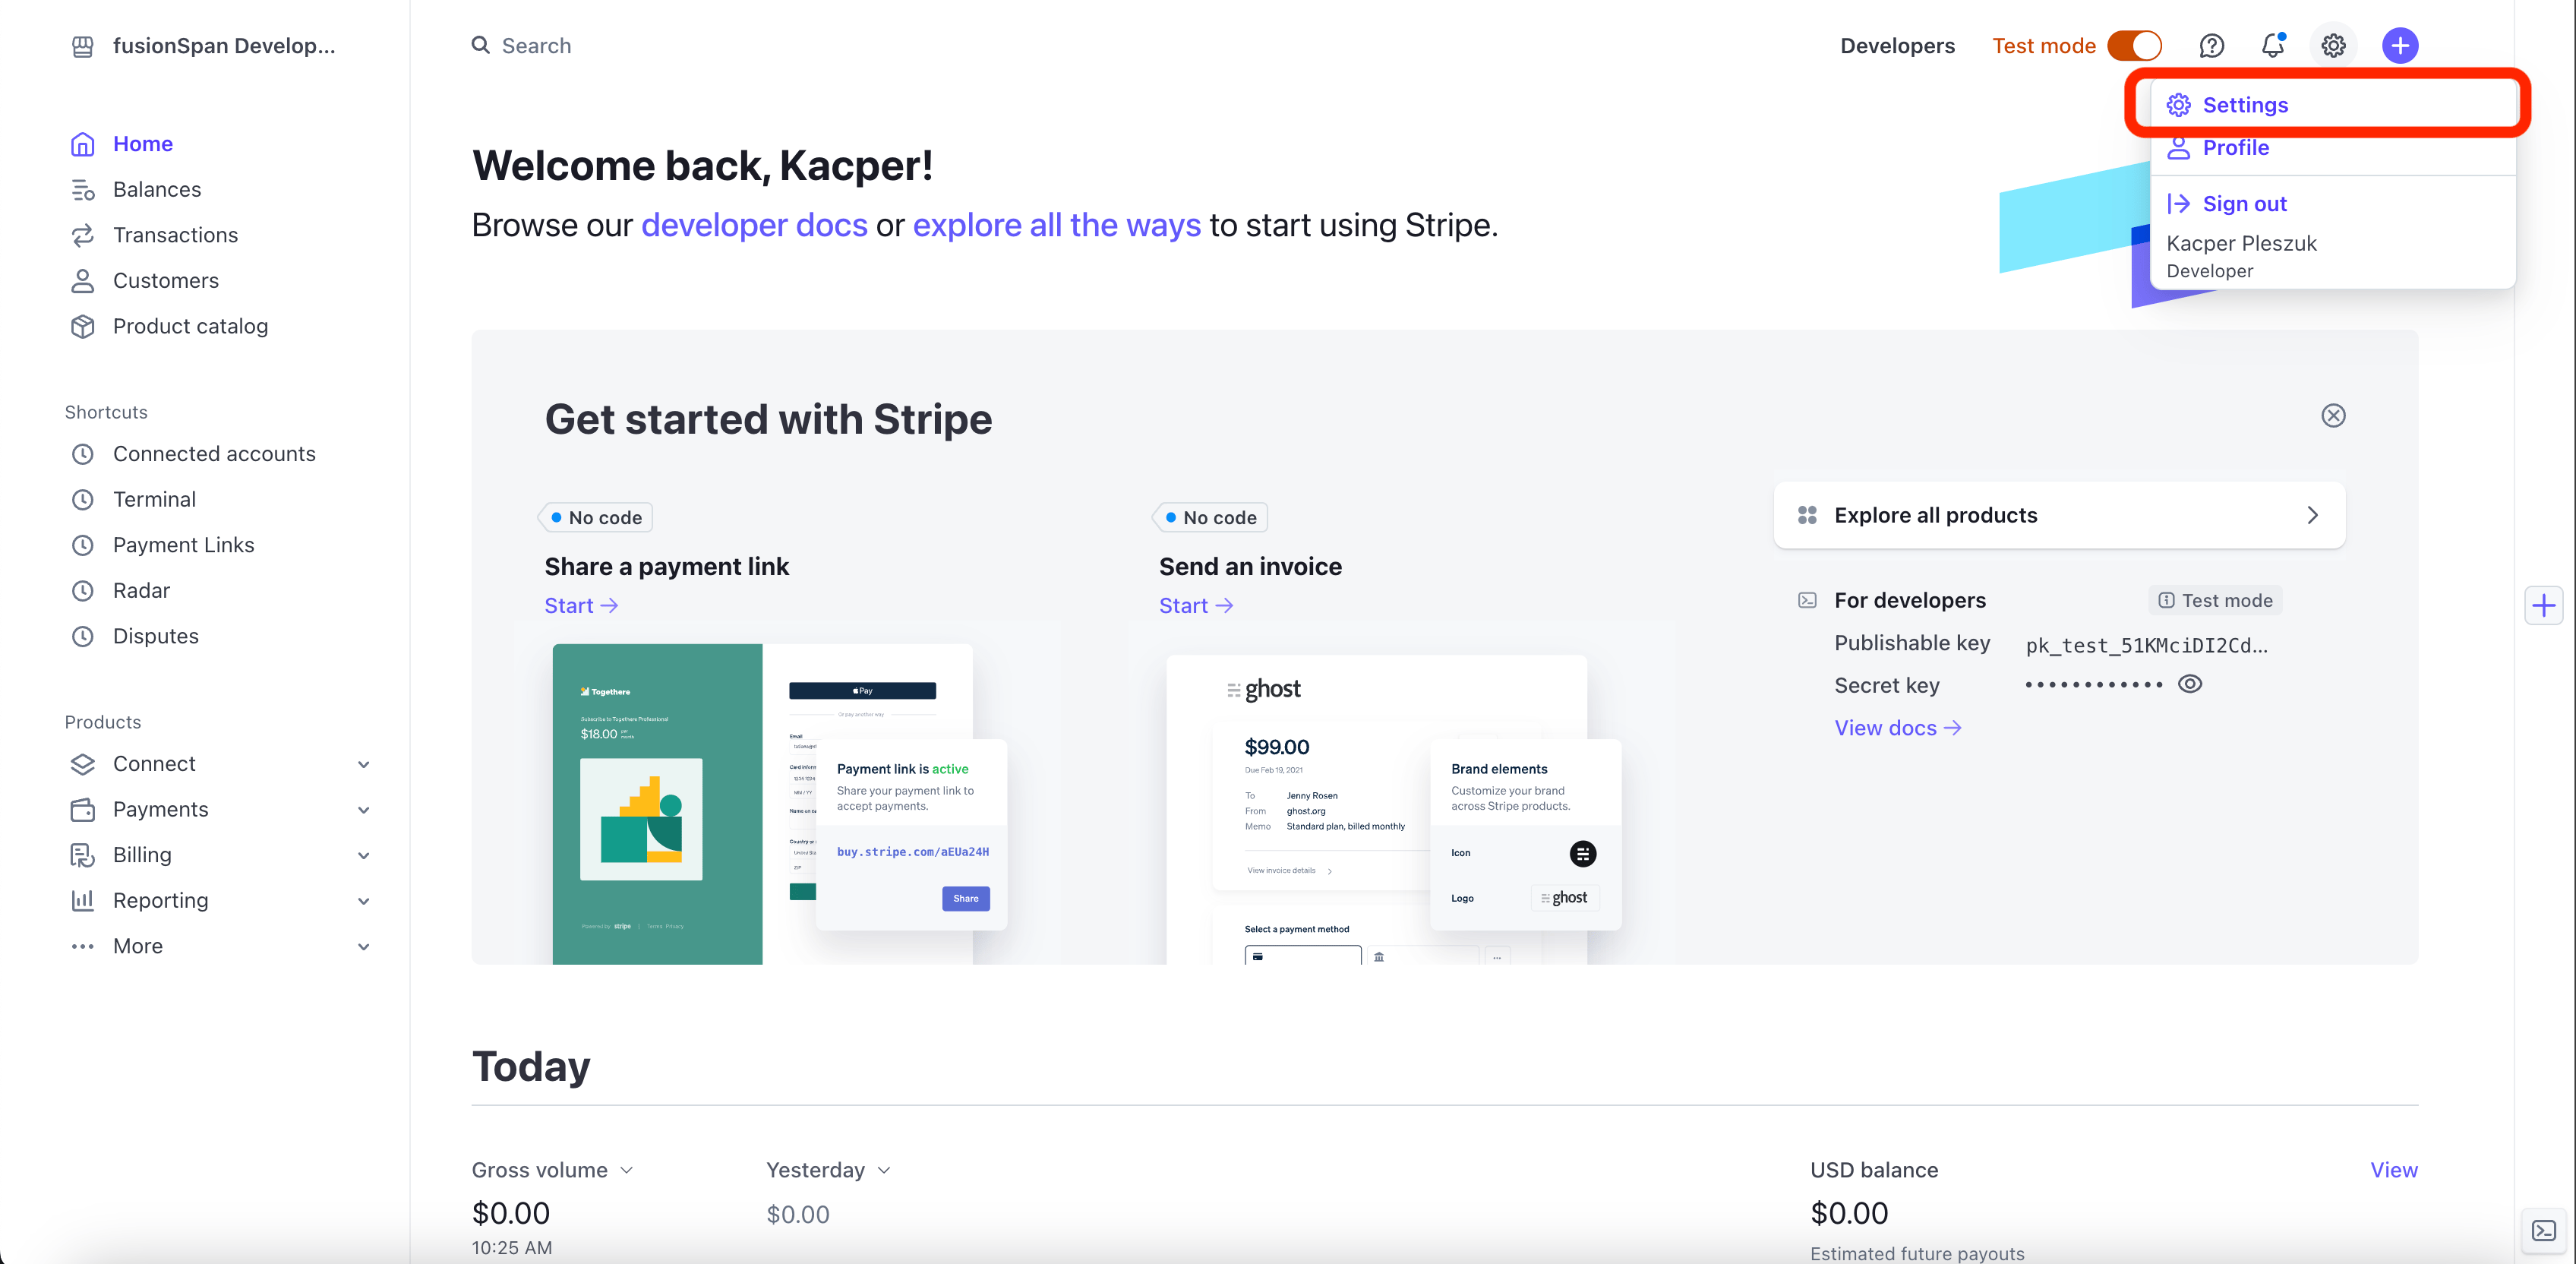
From the Stripe home screen, click **Settings** at the top right.
Once all sections are complete, click **Submit** to finish onboarding.
### Configure Your Payment Methods
After your account is onboarded, configure the payment methods you want to accept.
From the Stripe home screen, click **Settings** at the top right.
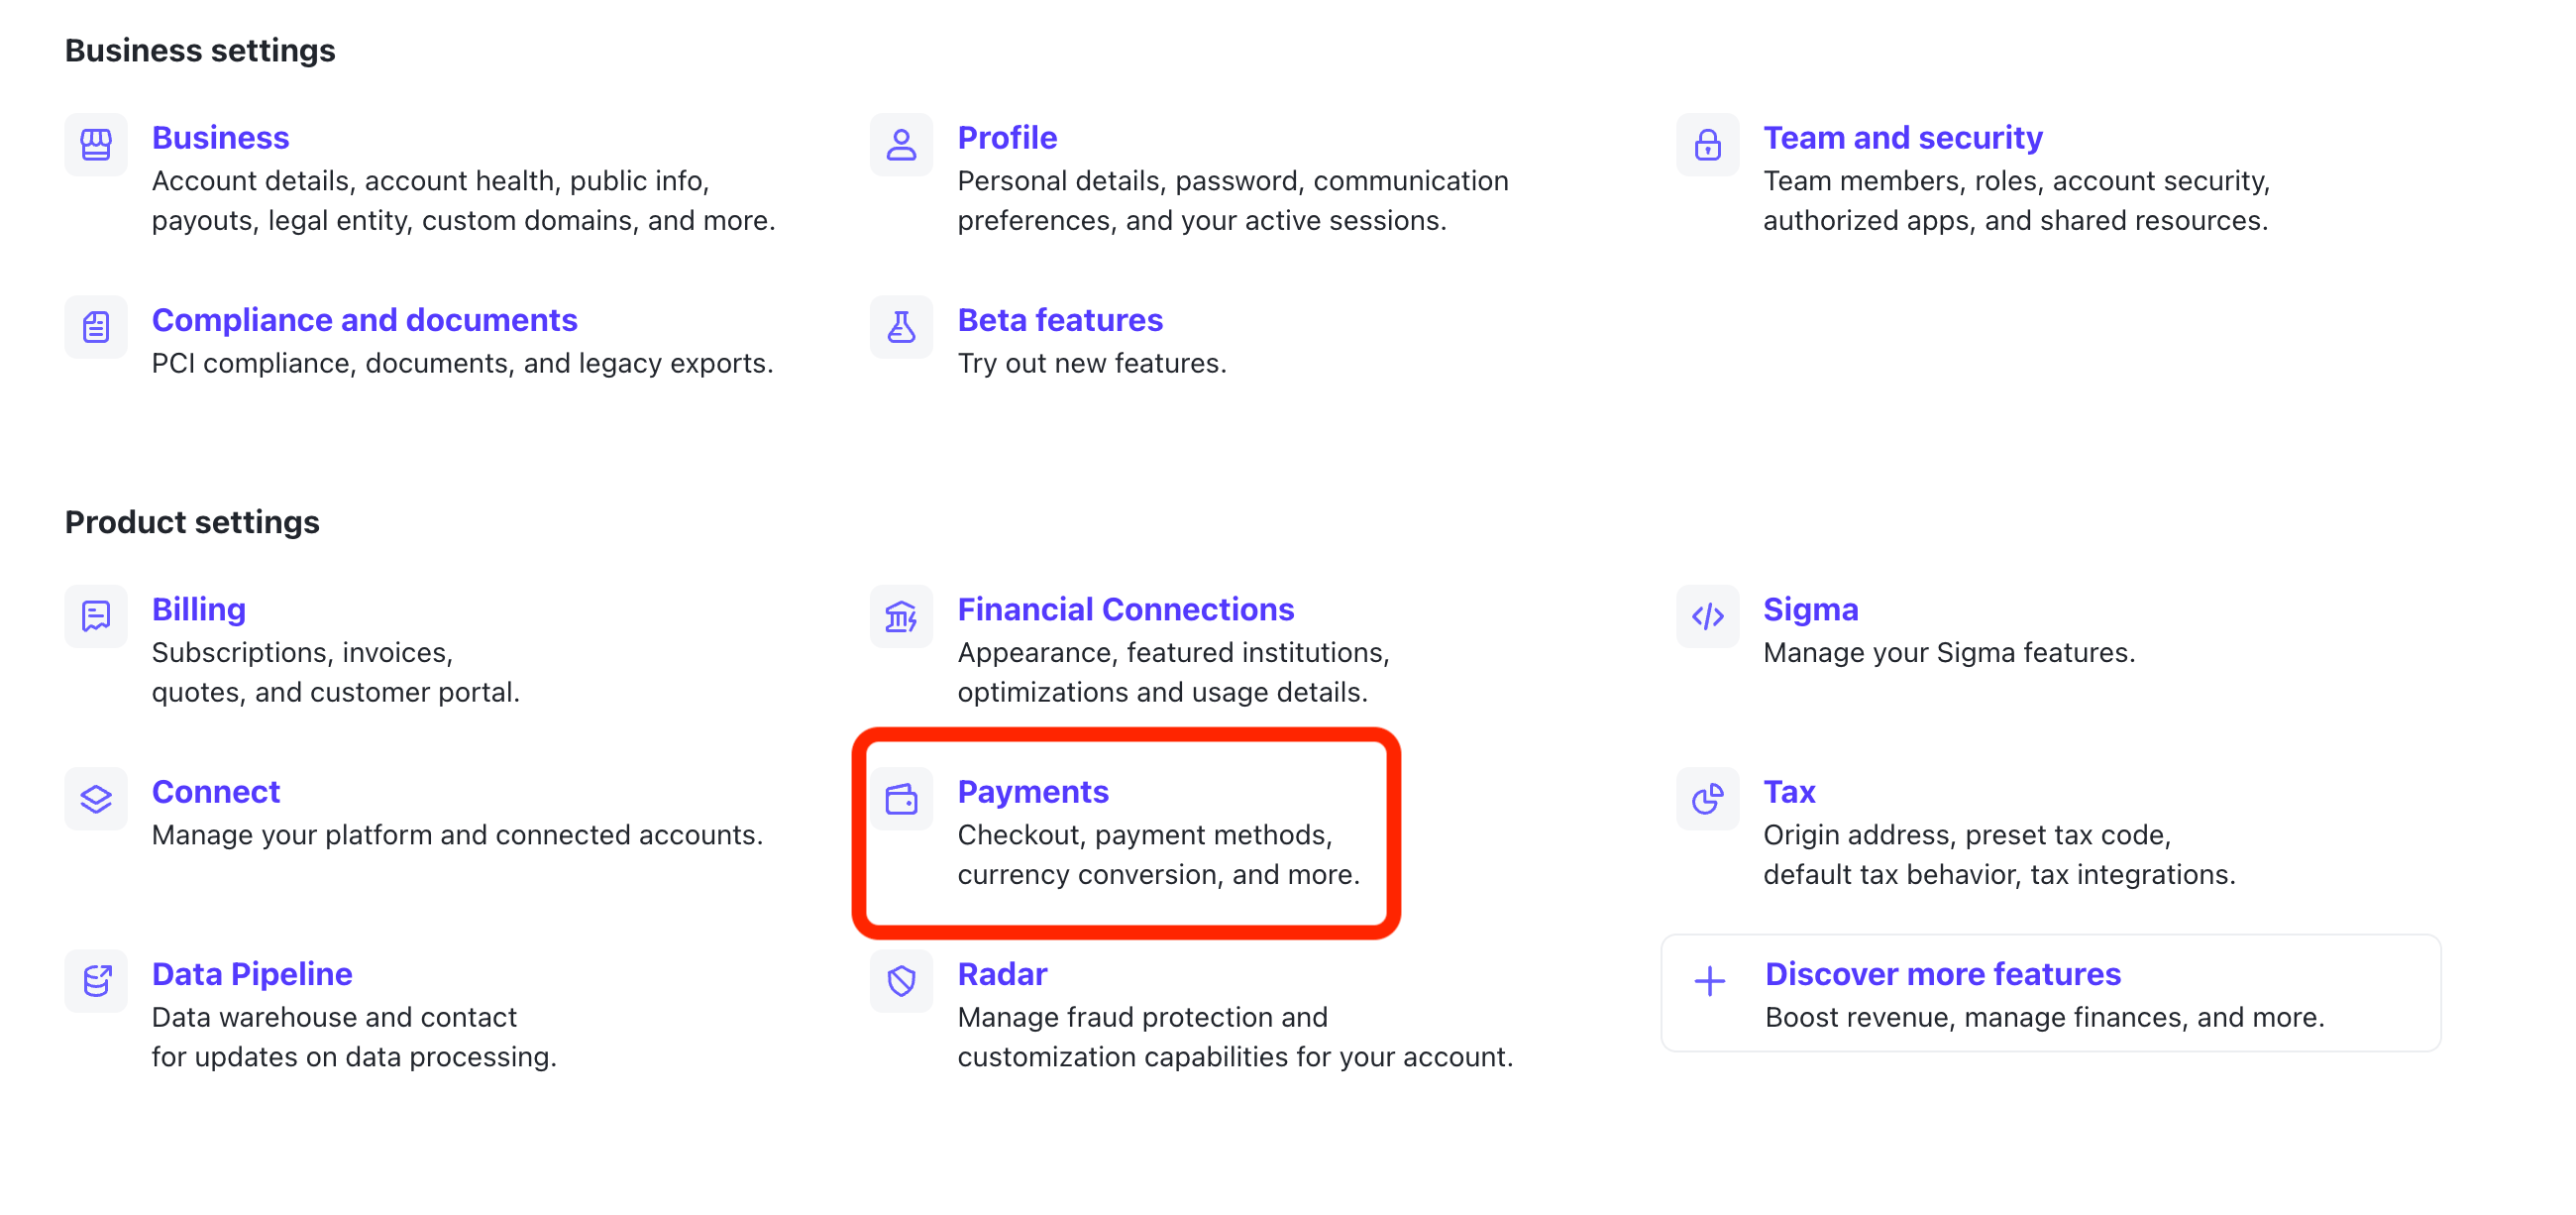
 Click **Payments**.
 Card payments are active by default — no action needed.
 Activate ACH (bank transfer) manually.
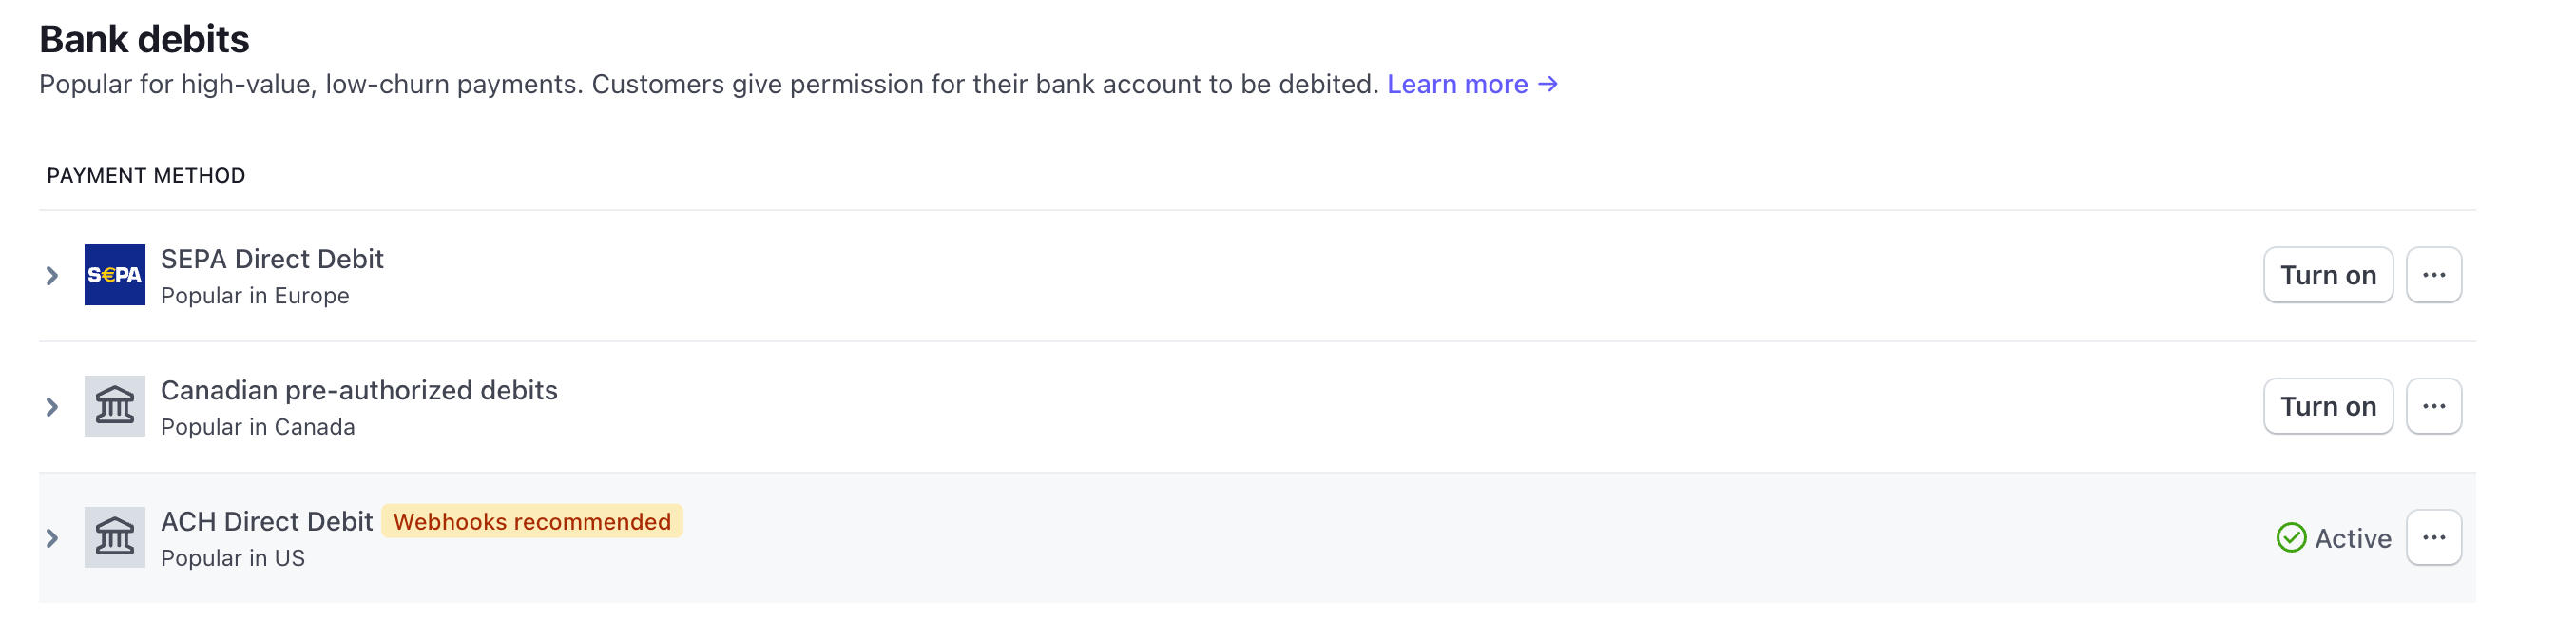 On a standard (connected-account) Stripe setup, fusionCore supports **Card** and **ACH** payments. Do not configure other payment methods unless your implementation team has confirmed your org is on a Stripe Direct setup. Alipay and WeChat Pay are only available with a Stripe Direct account.
When your payment methods are set, **notify the fusionCore team**. They complete the connection so your account links correctly to Salesforce.
### Set Up Live Webhooks for Your Salesforce Org
A **webhook** is the URL Stripe calls to send payment events back to your Salesforce org. Set up the live webhook against your live Stripe account.
Log into your Stripe account on the Stripe website. Confirm you are in the correct account using the account name at the top left.
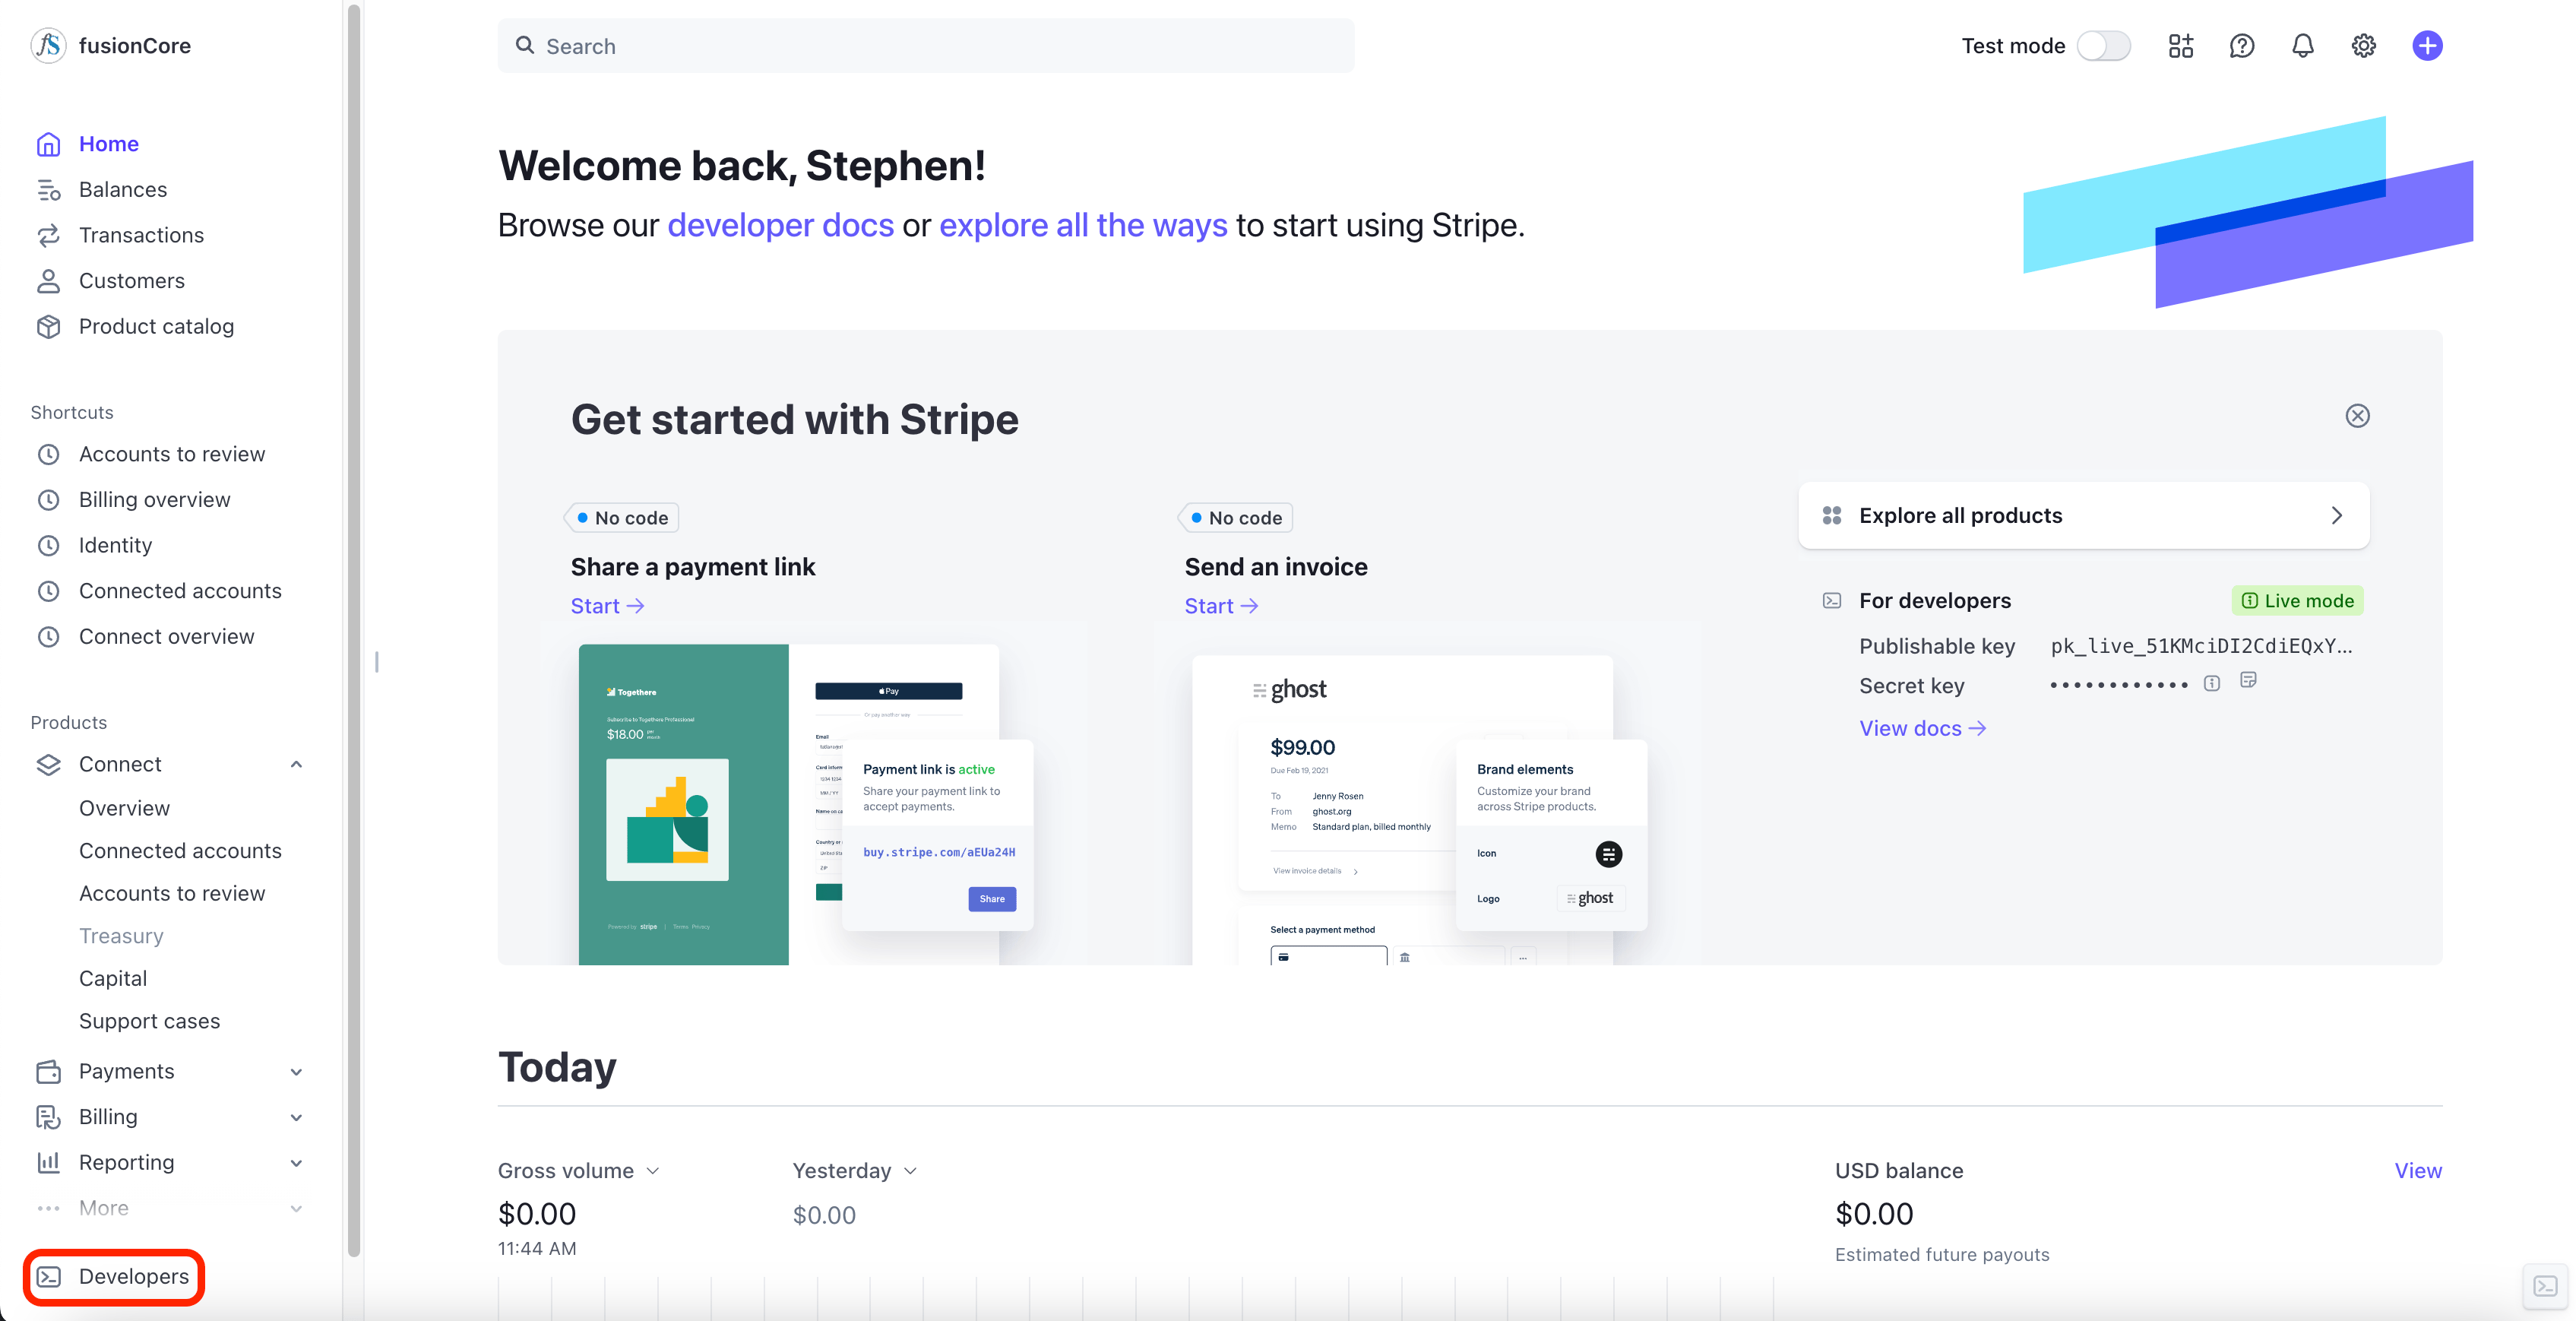
Click **Developers**.
On a standard (connected-account) Stripe setup, fusionCore supports **Card** and **ACH** payments. Do not configure other payment methods unless your implementation team has confirmed your org is on a Stripe Direct setup. Alipay and WeChat Pay are only available with a Stripe Direct account.
When your payment methods are set, **notify the fusionCore team**. They complete the connection so your account links correctly to Salesforce.
### Set Up Live Webhooks for Your Salesforce Org
A **webhook** is the URL Stripe calls to send payment events back to your Salesforce org. Set up the live webhook against your live Stripe account.
Log into your Stripe account on the Stripe website. Confirm you are in the correct account using the account name at the top left.
Click **Developers**.
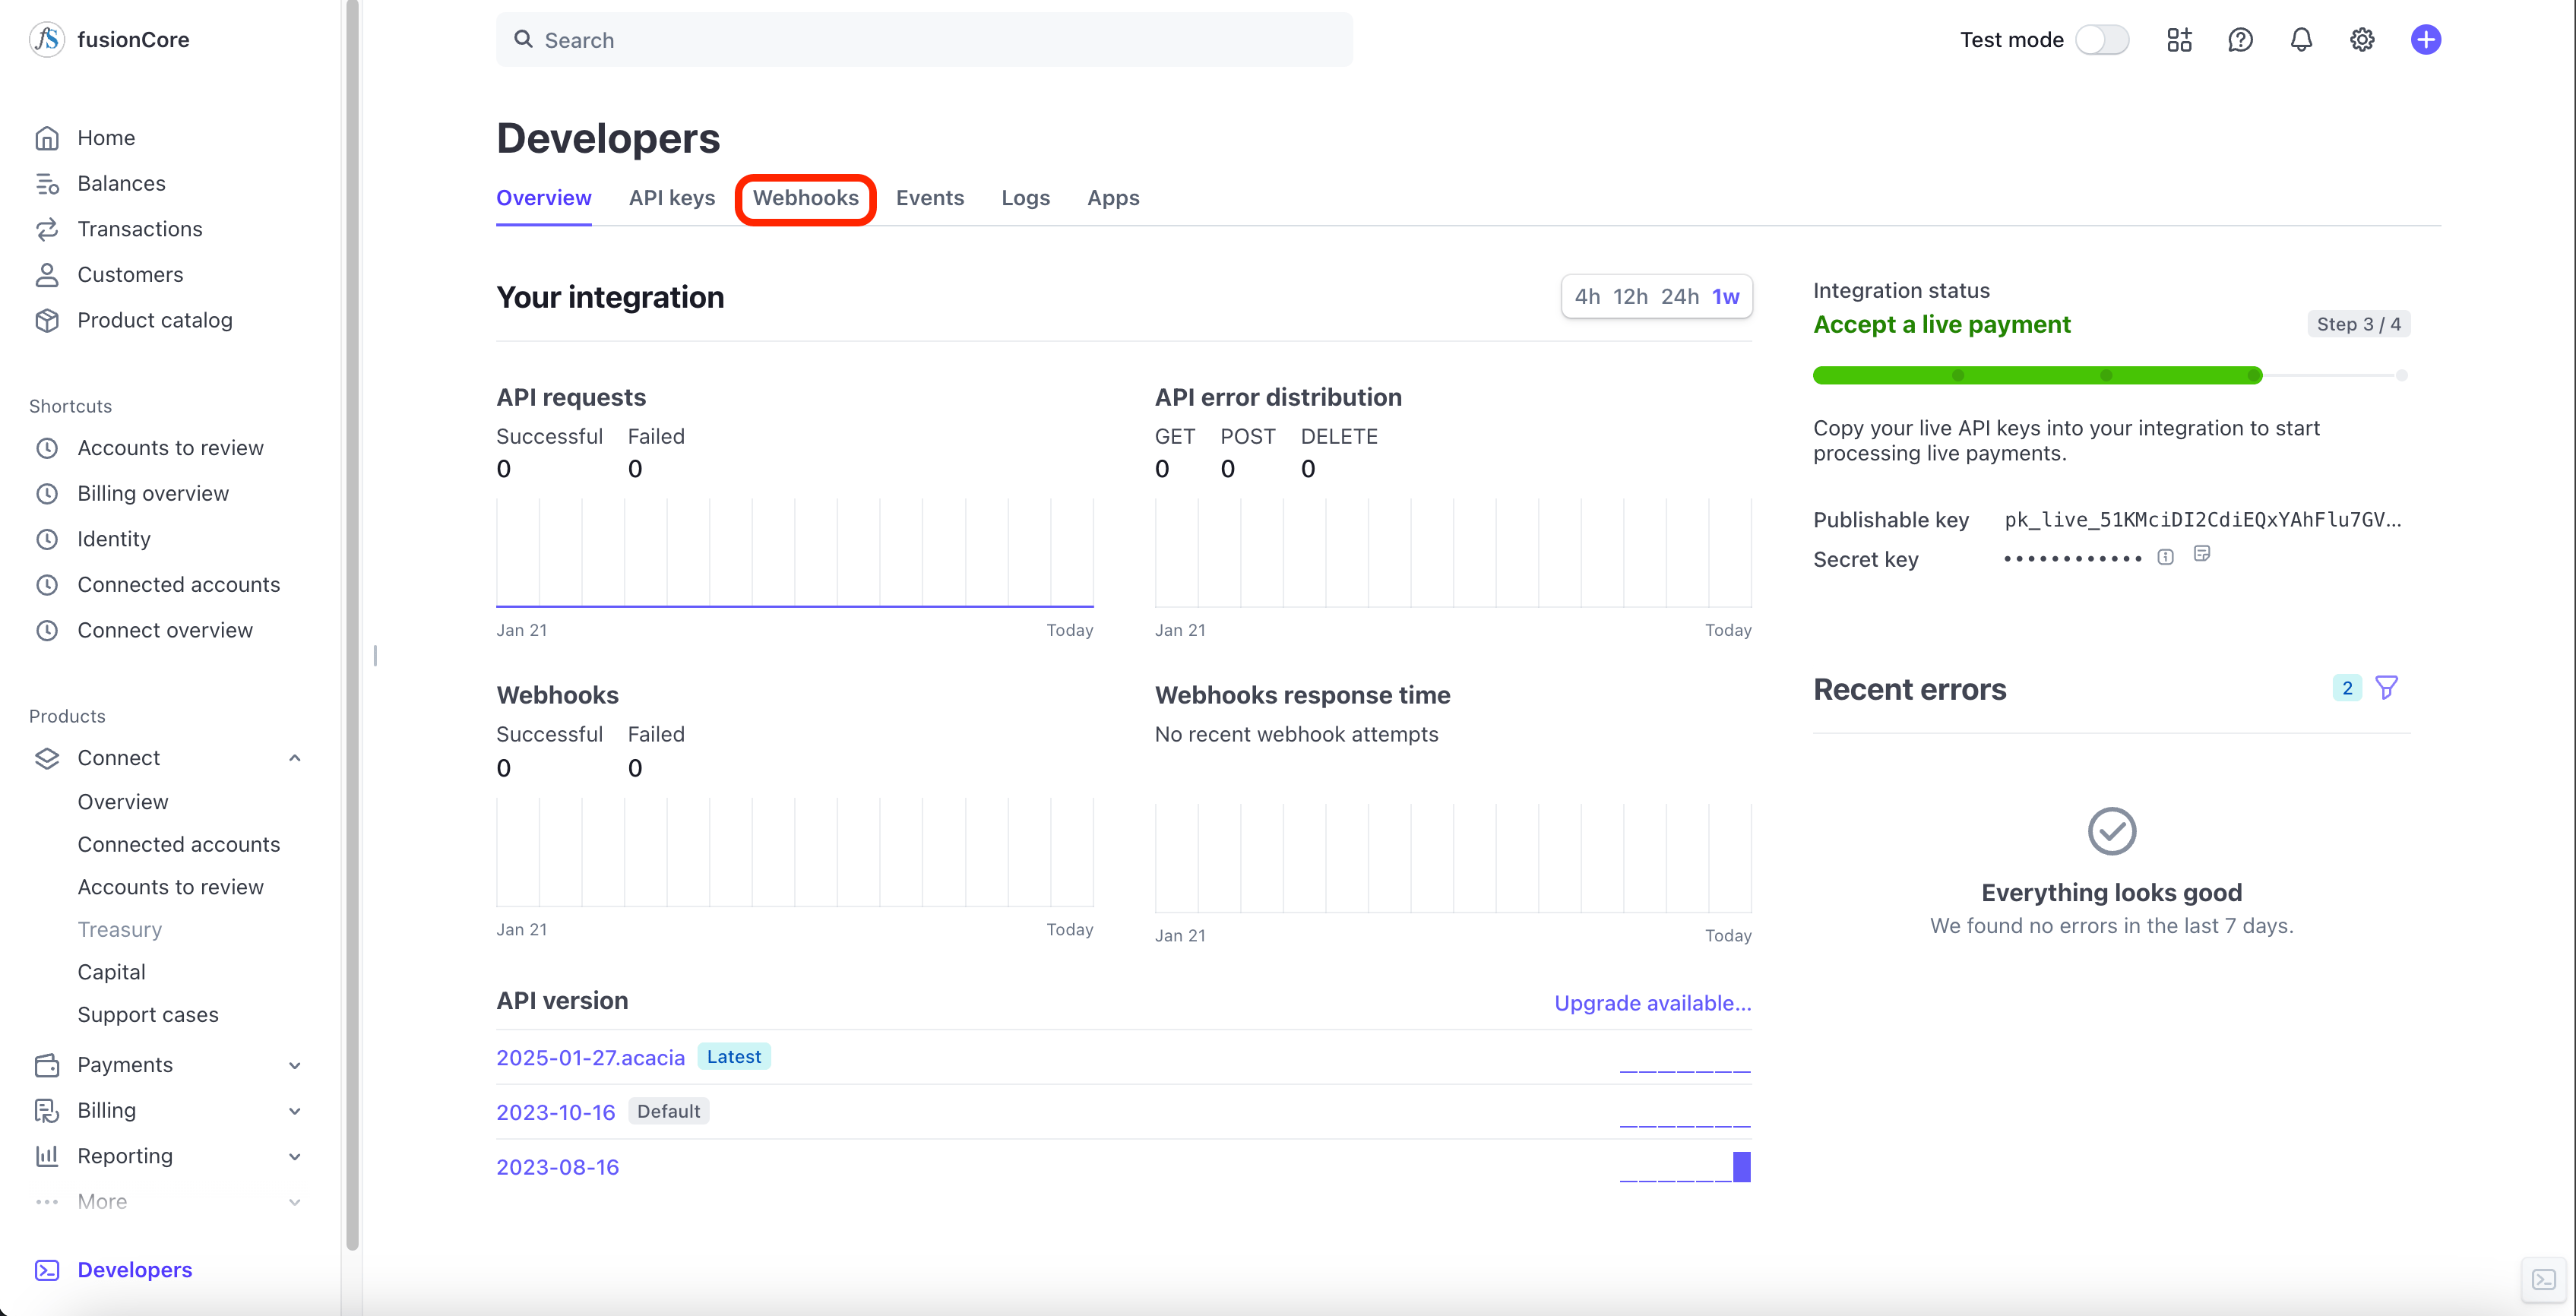
 Click **Webhooks**.
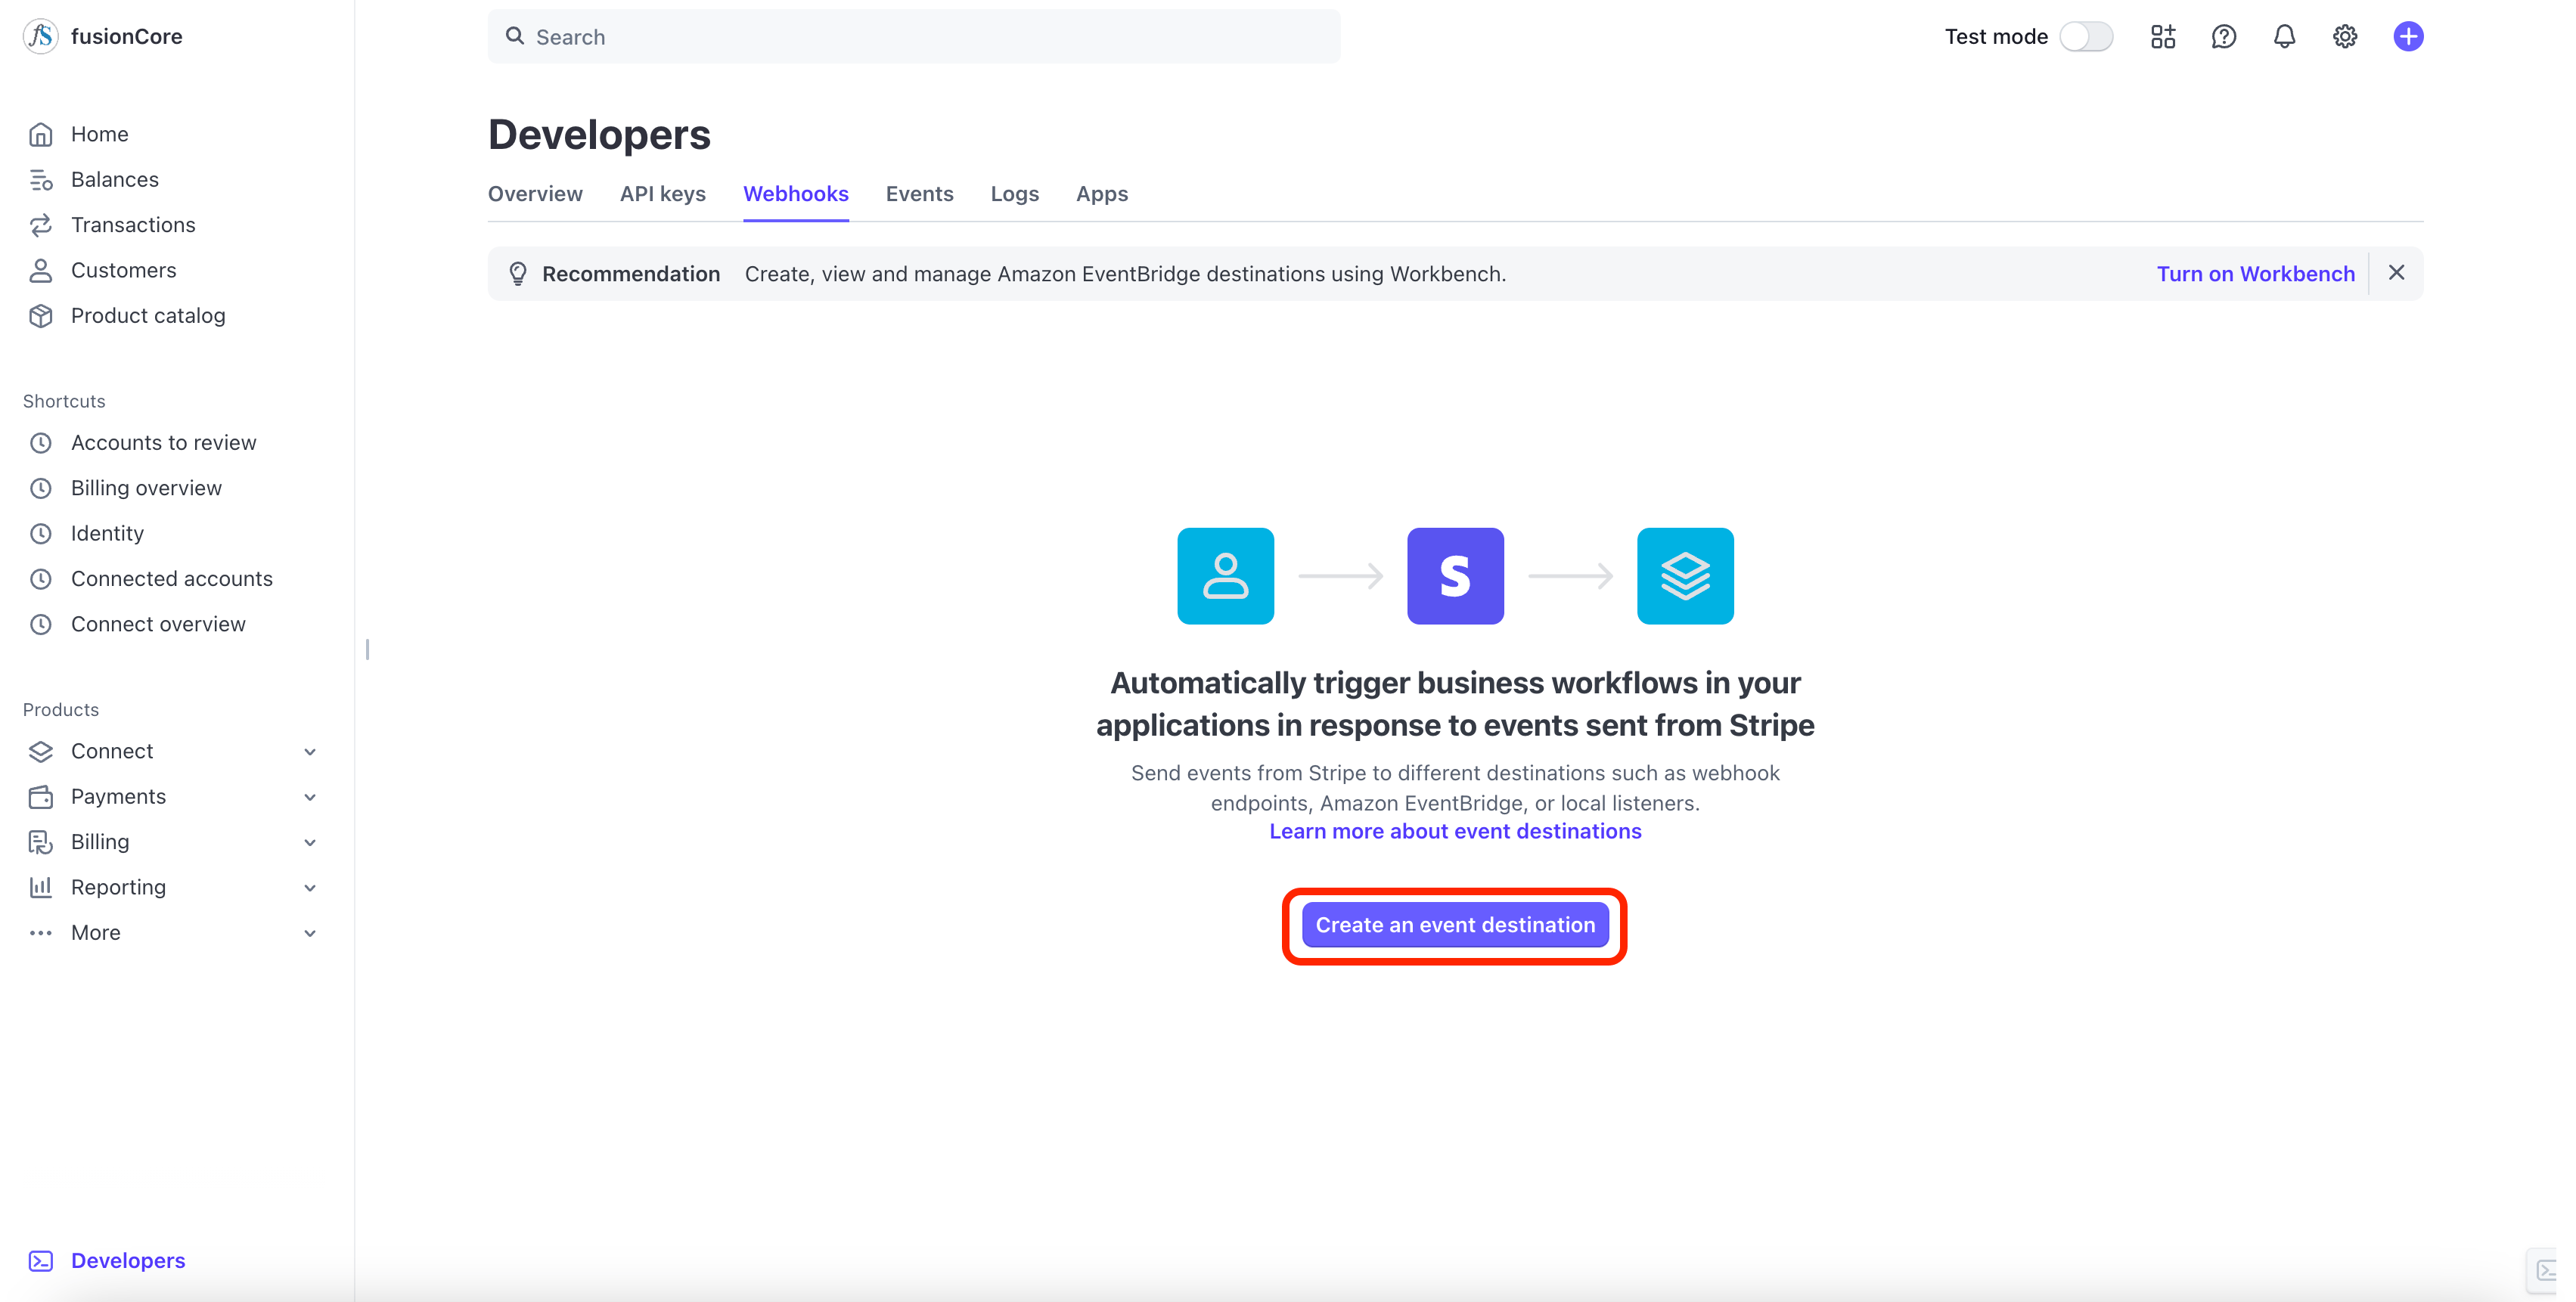
 Click **Create an event destination**.
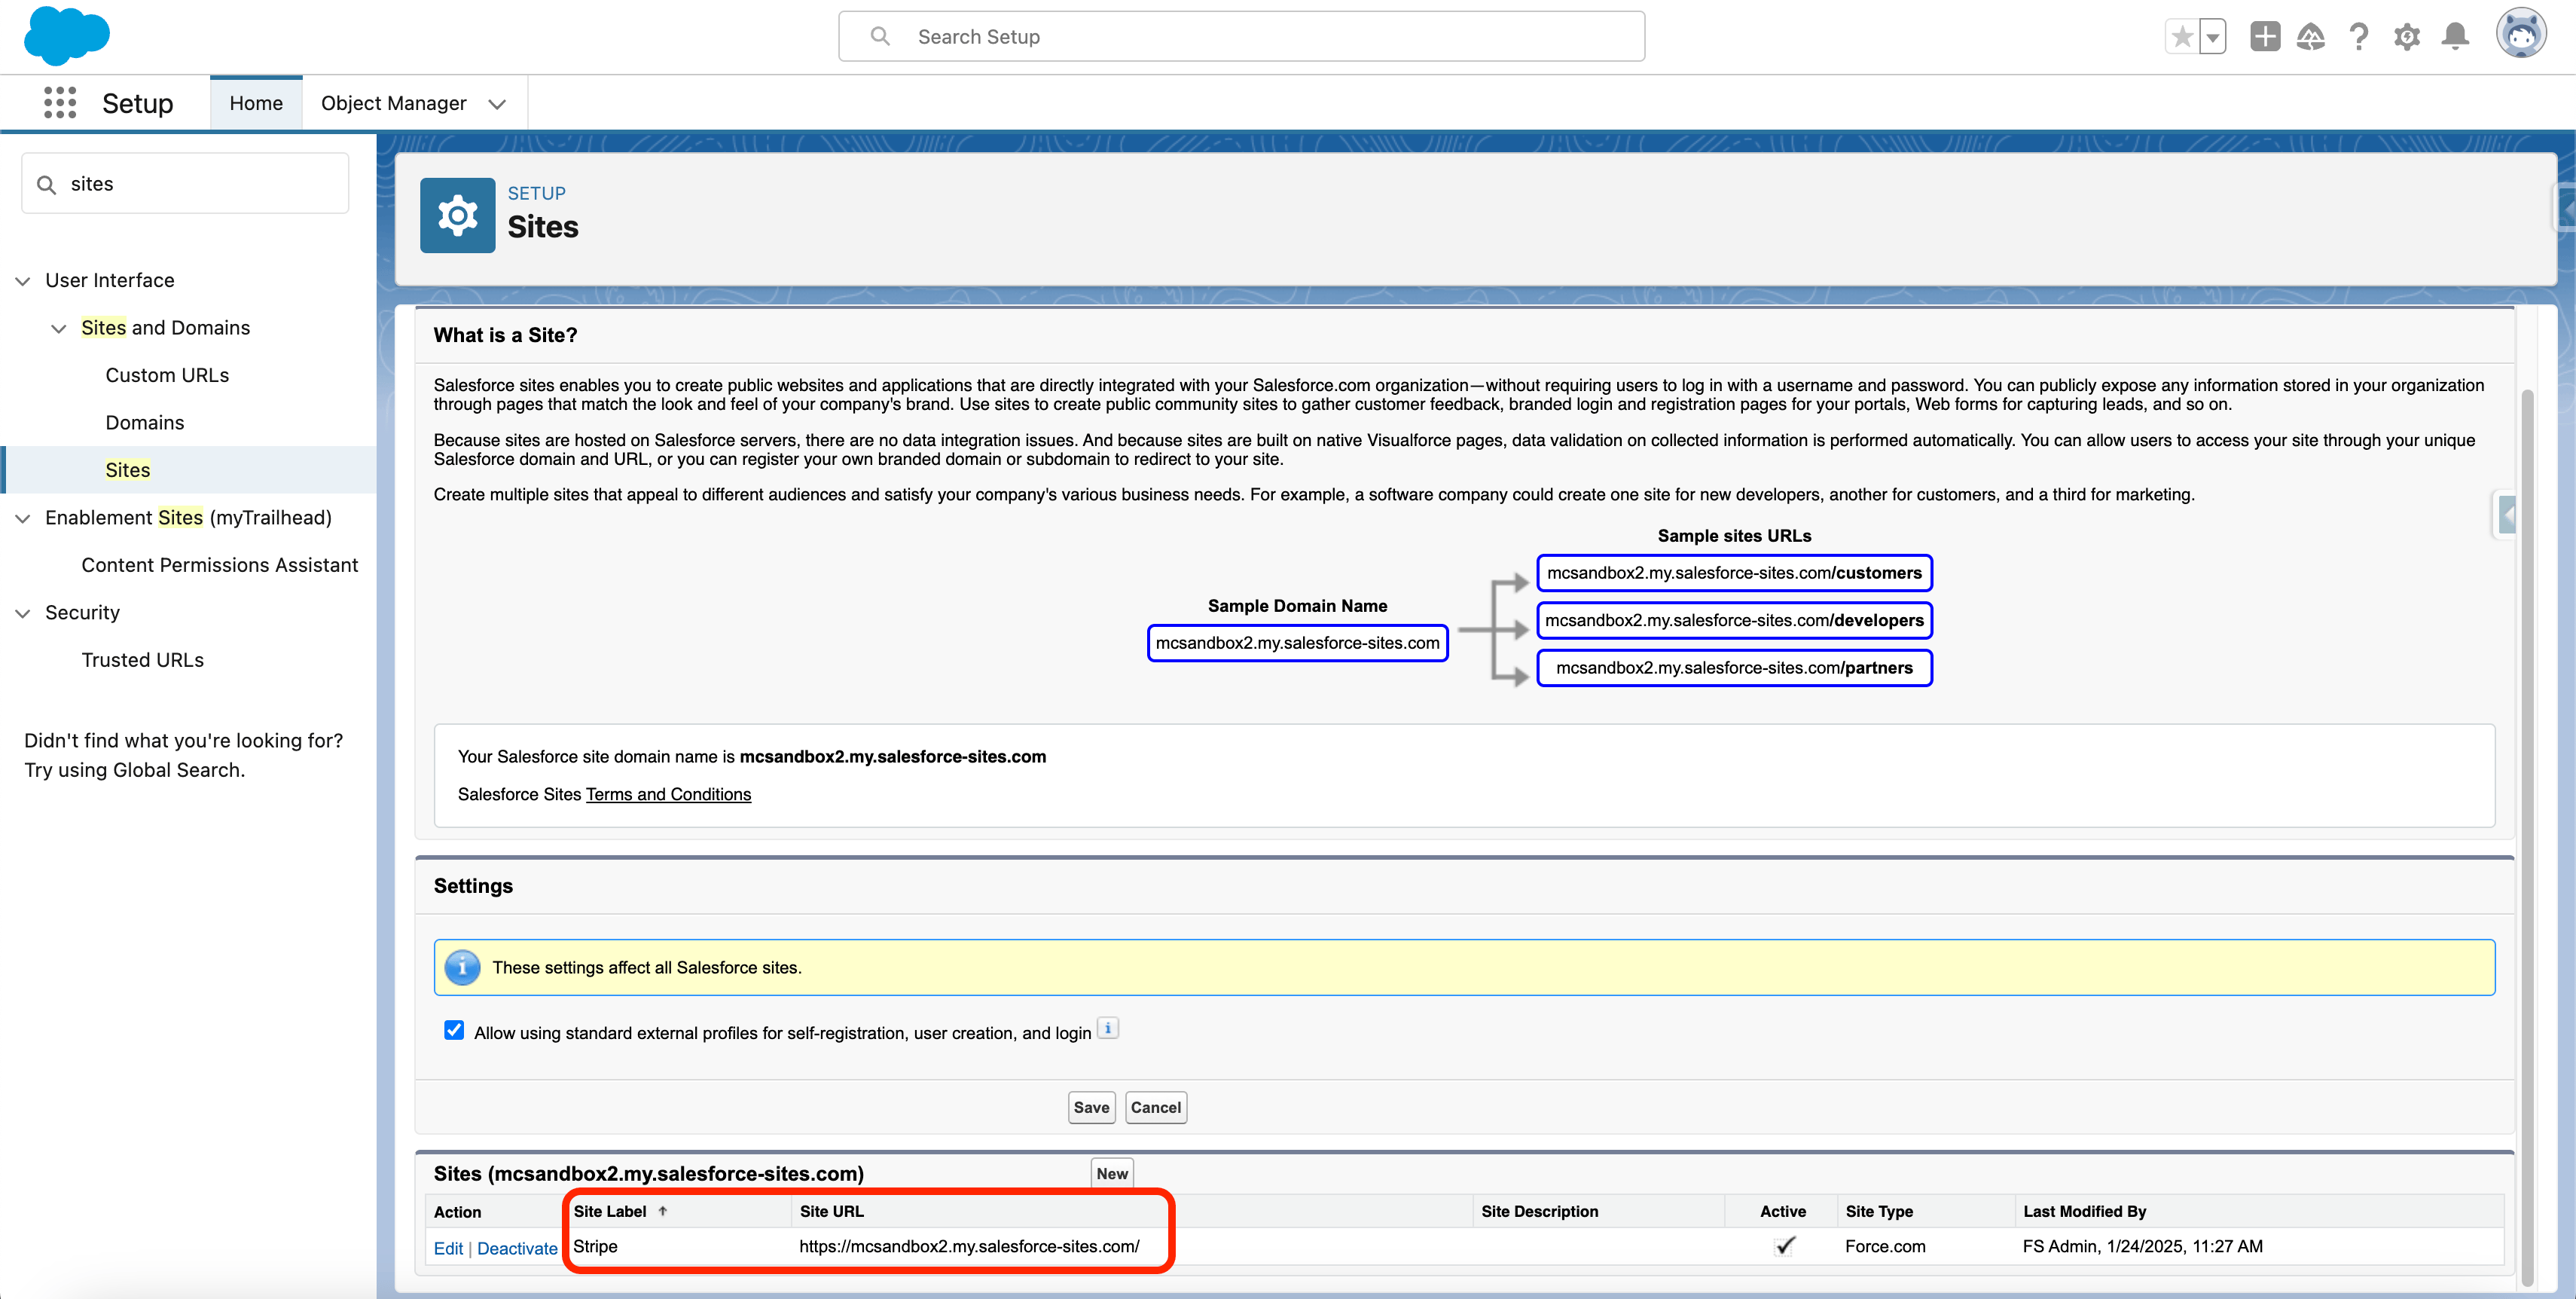
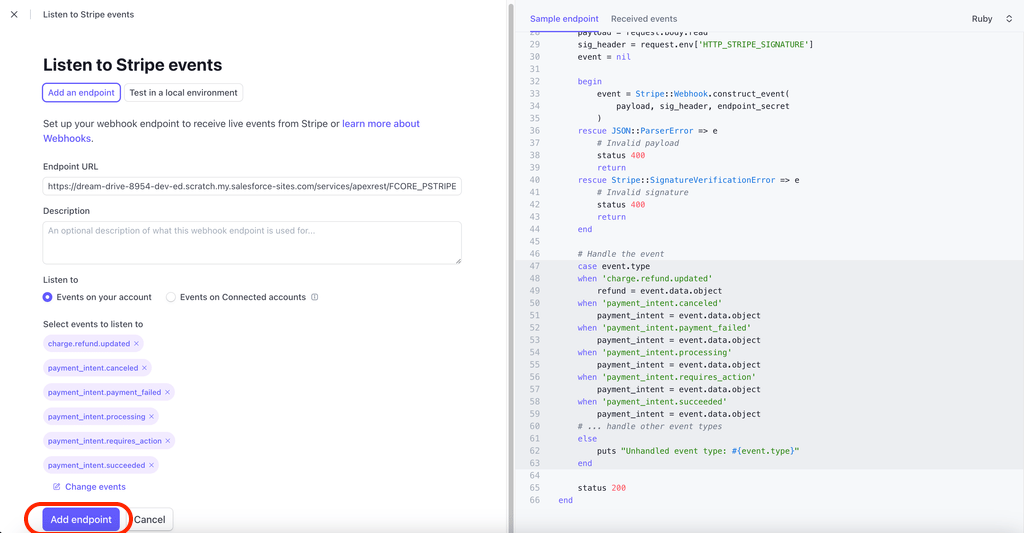
 Build your endpoint URL from your Salesforce site URL plus the fusionCore path.
Your Salesforce site URL is in this format:
```
[yourURL].my.salesforce-sites.com
```
Append the fusionCore webhook path:
```
/services/apexrest/FCORE_PSTRIPE/Stripe
```
The final URL resembles:
```
acme-association.my.salesforce-sites.com/services/apexrest/FCORE_PSTRIPE/Stripe
```
Enter the full URL with no extra slashes or spaces.
Build your endpoint URL from your Salesforce site URL plus the fusionCore path.
Your Salesforce site URL is in this format:
```
[yourURL].my.salesforce-sites.com
```
Append the fusionCore webhook path:
```
/services/apexrest/FCORE_PSTRIPE/Stripe
```
The final URL resembles:
```
acme-association.my.salesforce-sites.com/services/apexrest/FCORE_PSTRIPE/Stripe
```
Enter the full URL with no extra slashes or spaces.
 Using the **Select events** button just above **Add endpoint**, subscribe to these 15 events:
* `charge.refund.updated`
* `payment_intent.canceled`
* `payment_intent.payment_failed`
* `payment_intent.processing`
* `payment_intent.requires_action`
* `payment_intent.succeeded`
* `customer.created`
* `customer.updated`
* `setup_intent.canceled`
* `setup_intent.requires_action`
* `setup_intent.setup_failed`
* `setup_intent.succeeded`
* `payment_method.updated`
* `payment_method.automatically_updated`
* `payment_method.detached`
Subscribe only to these events. fusionCore handles exactly this set, and other event types create unnecessary errors in the Stripe API log. Stripe may automatically add `payment_method.card_automatically_updated`, so you may see 16 in the list — that is expected.
Using the **Select events** button just above **Add endpoint**, subscribe to these 15 events:
* `charge.refund.updated`
* `payment_intent.canceled`
* `payment_intent.payment_failed`
* `payment_intent.processing`
* `payment_intent.requires_action`
* `payment_intent.succeeded`
* `customer.created`
* `customer.updated`
* `setup_intent.canceled`
* `setup_intent.requires_action`
* `setup_intent.setup_failed`
* `setup_intent.succeeded`
* `payment_method.updated`
* `payment_method.automatically_updated`
* `payment_method.detached`
Subscribe only to these events. fusionCore handles exactly this set, and other event types create unnecessary errors in the Stripe API log. Stripe may automatically add `payment_method.card_automatically_updated`, so you may see 16 in the list — that is expected.
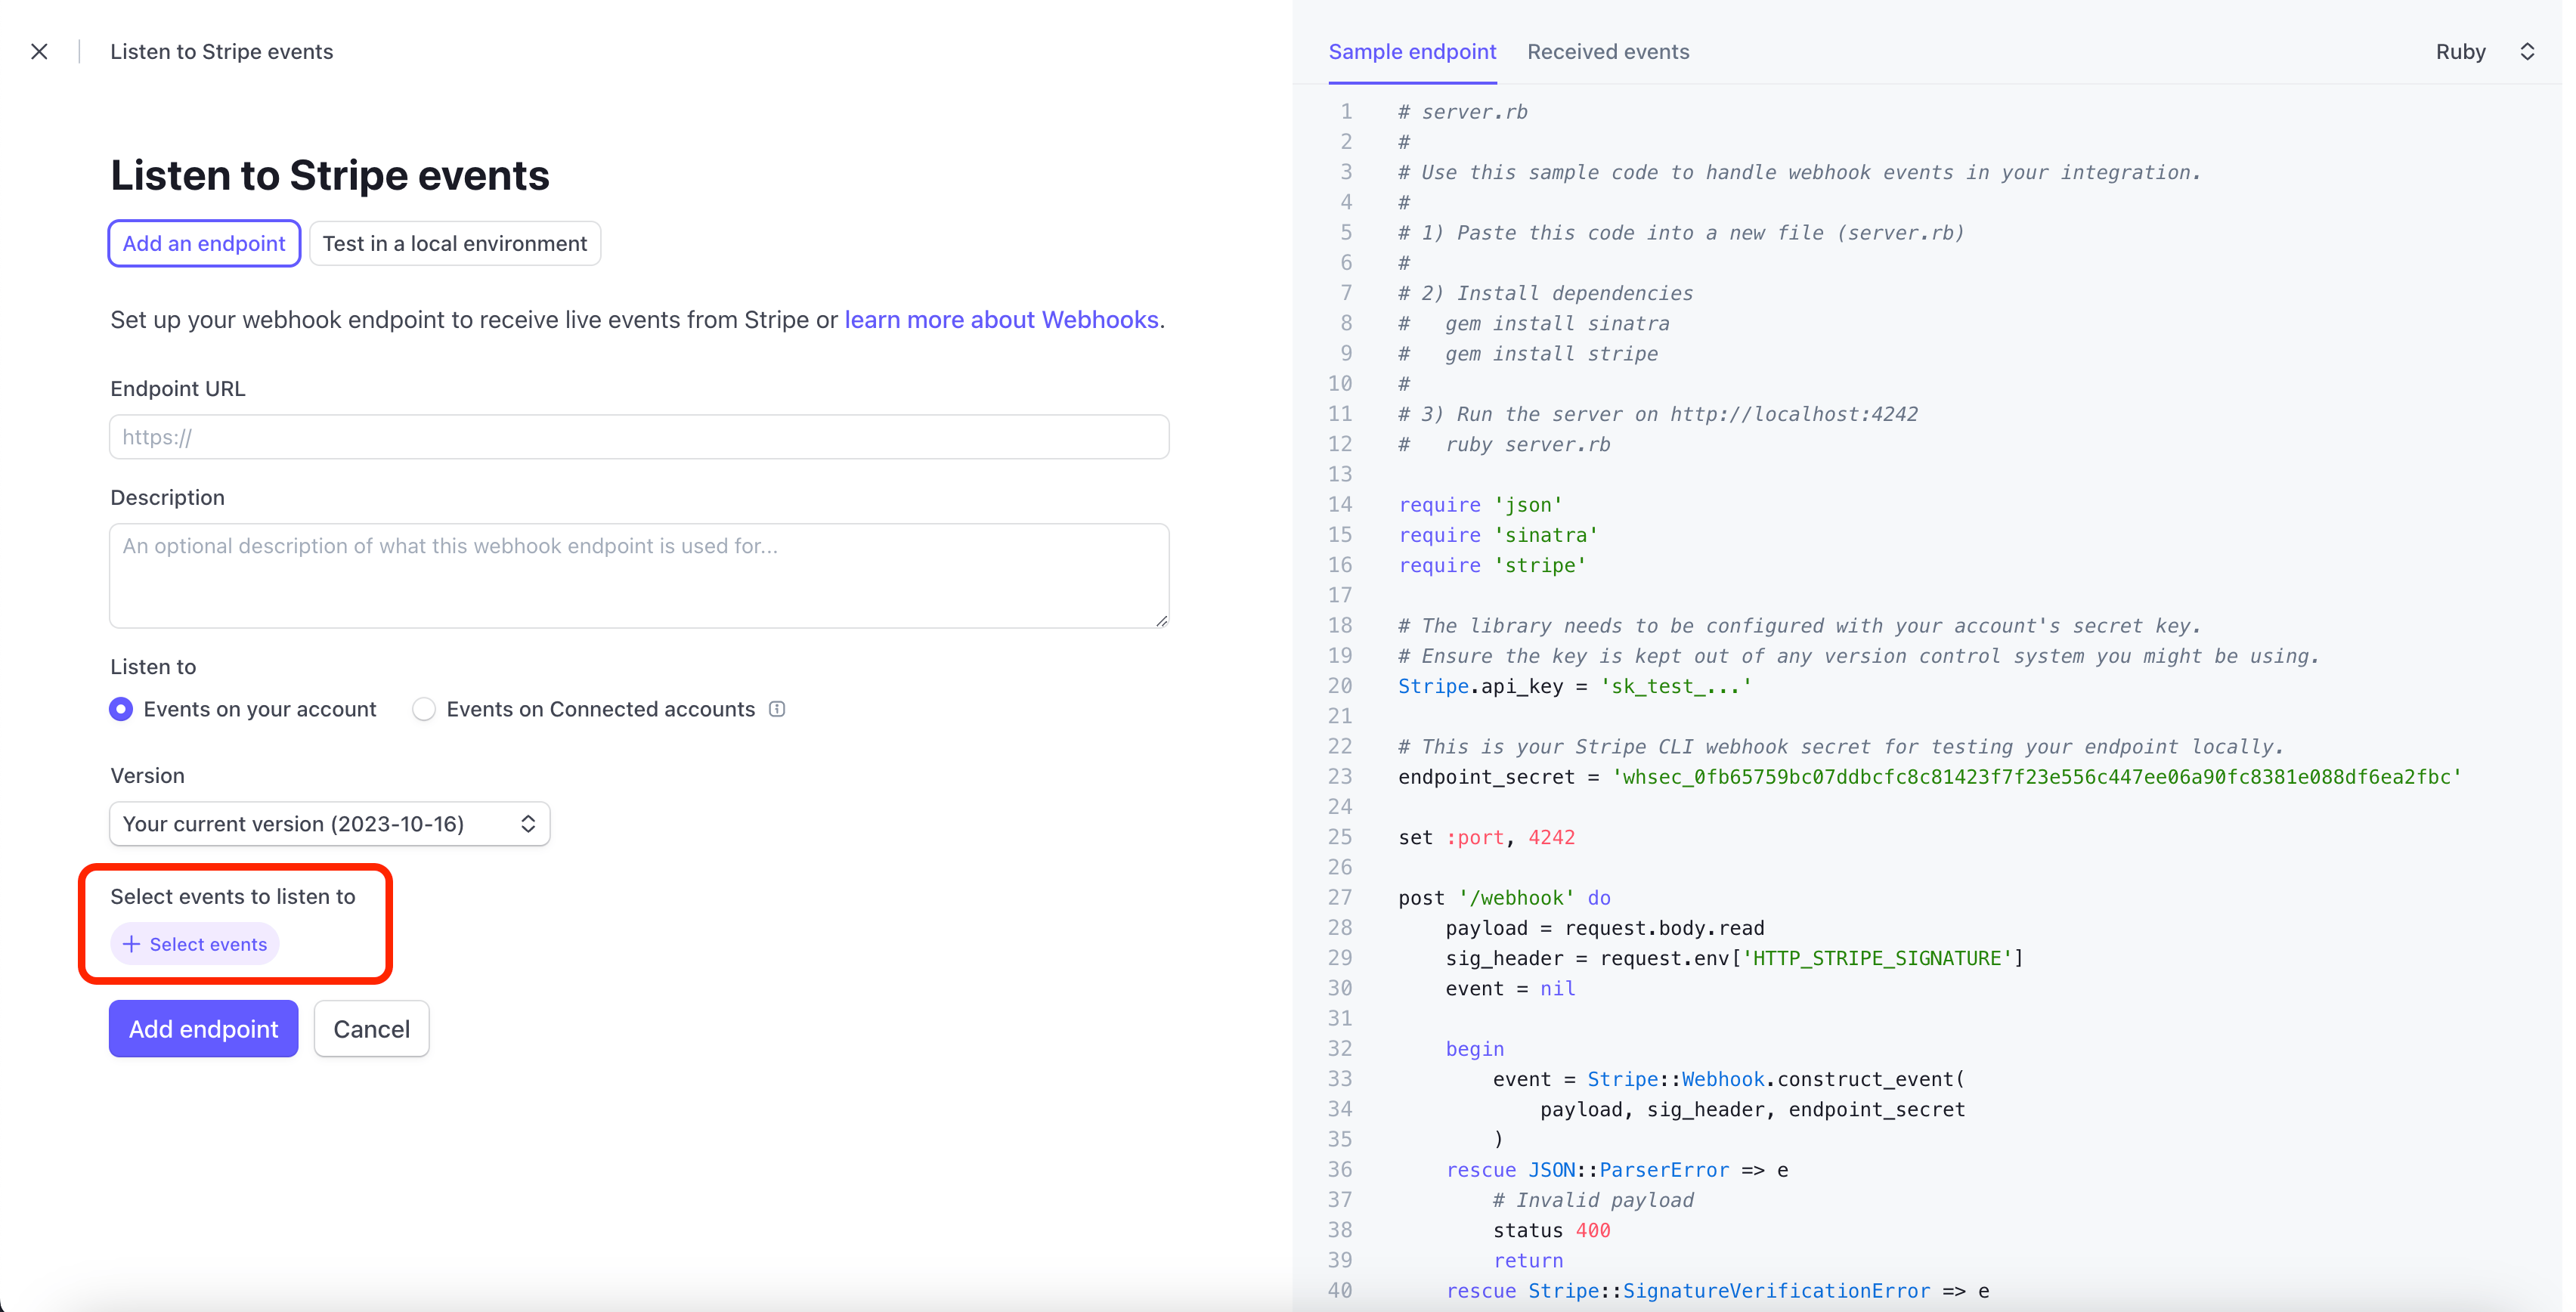 Click **Add endpoint** at the bottom left.
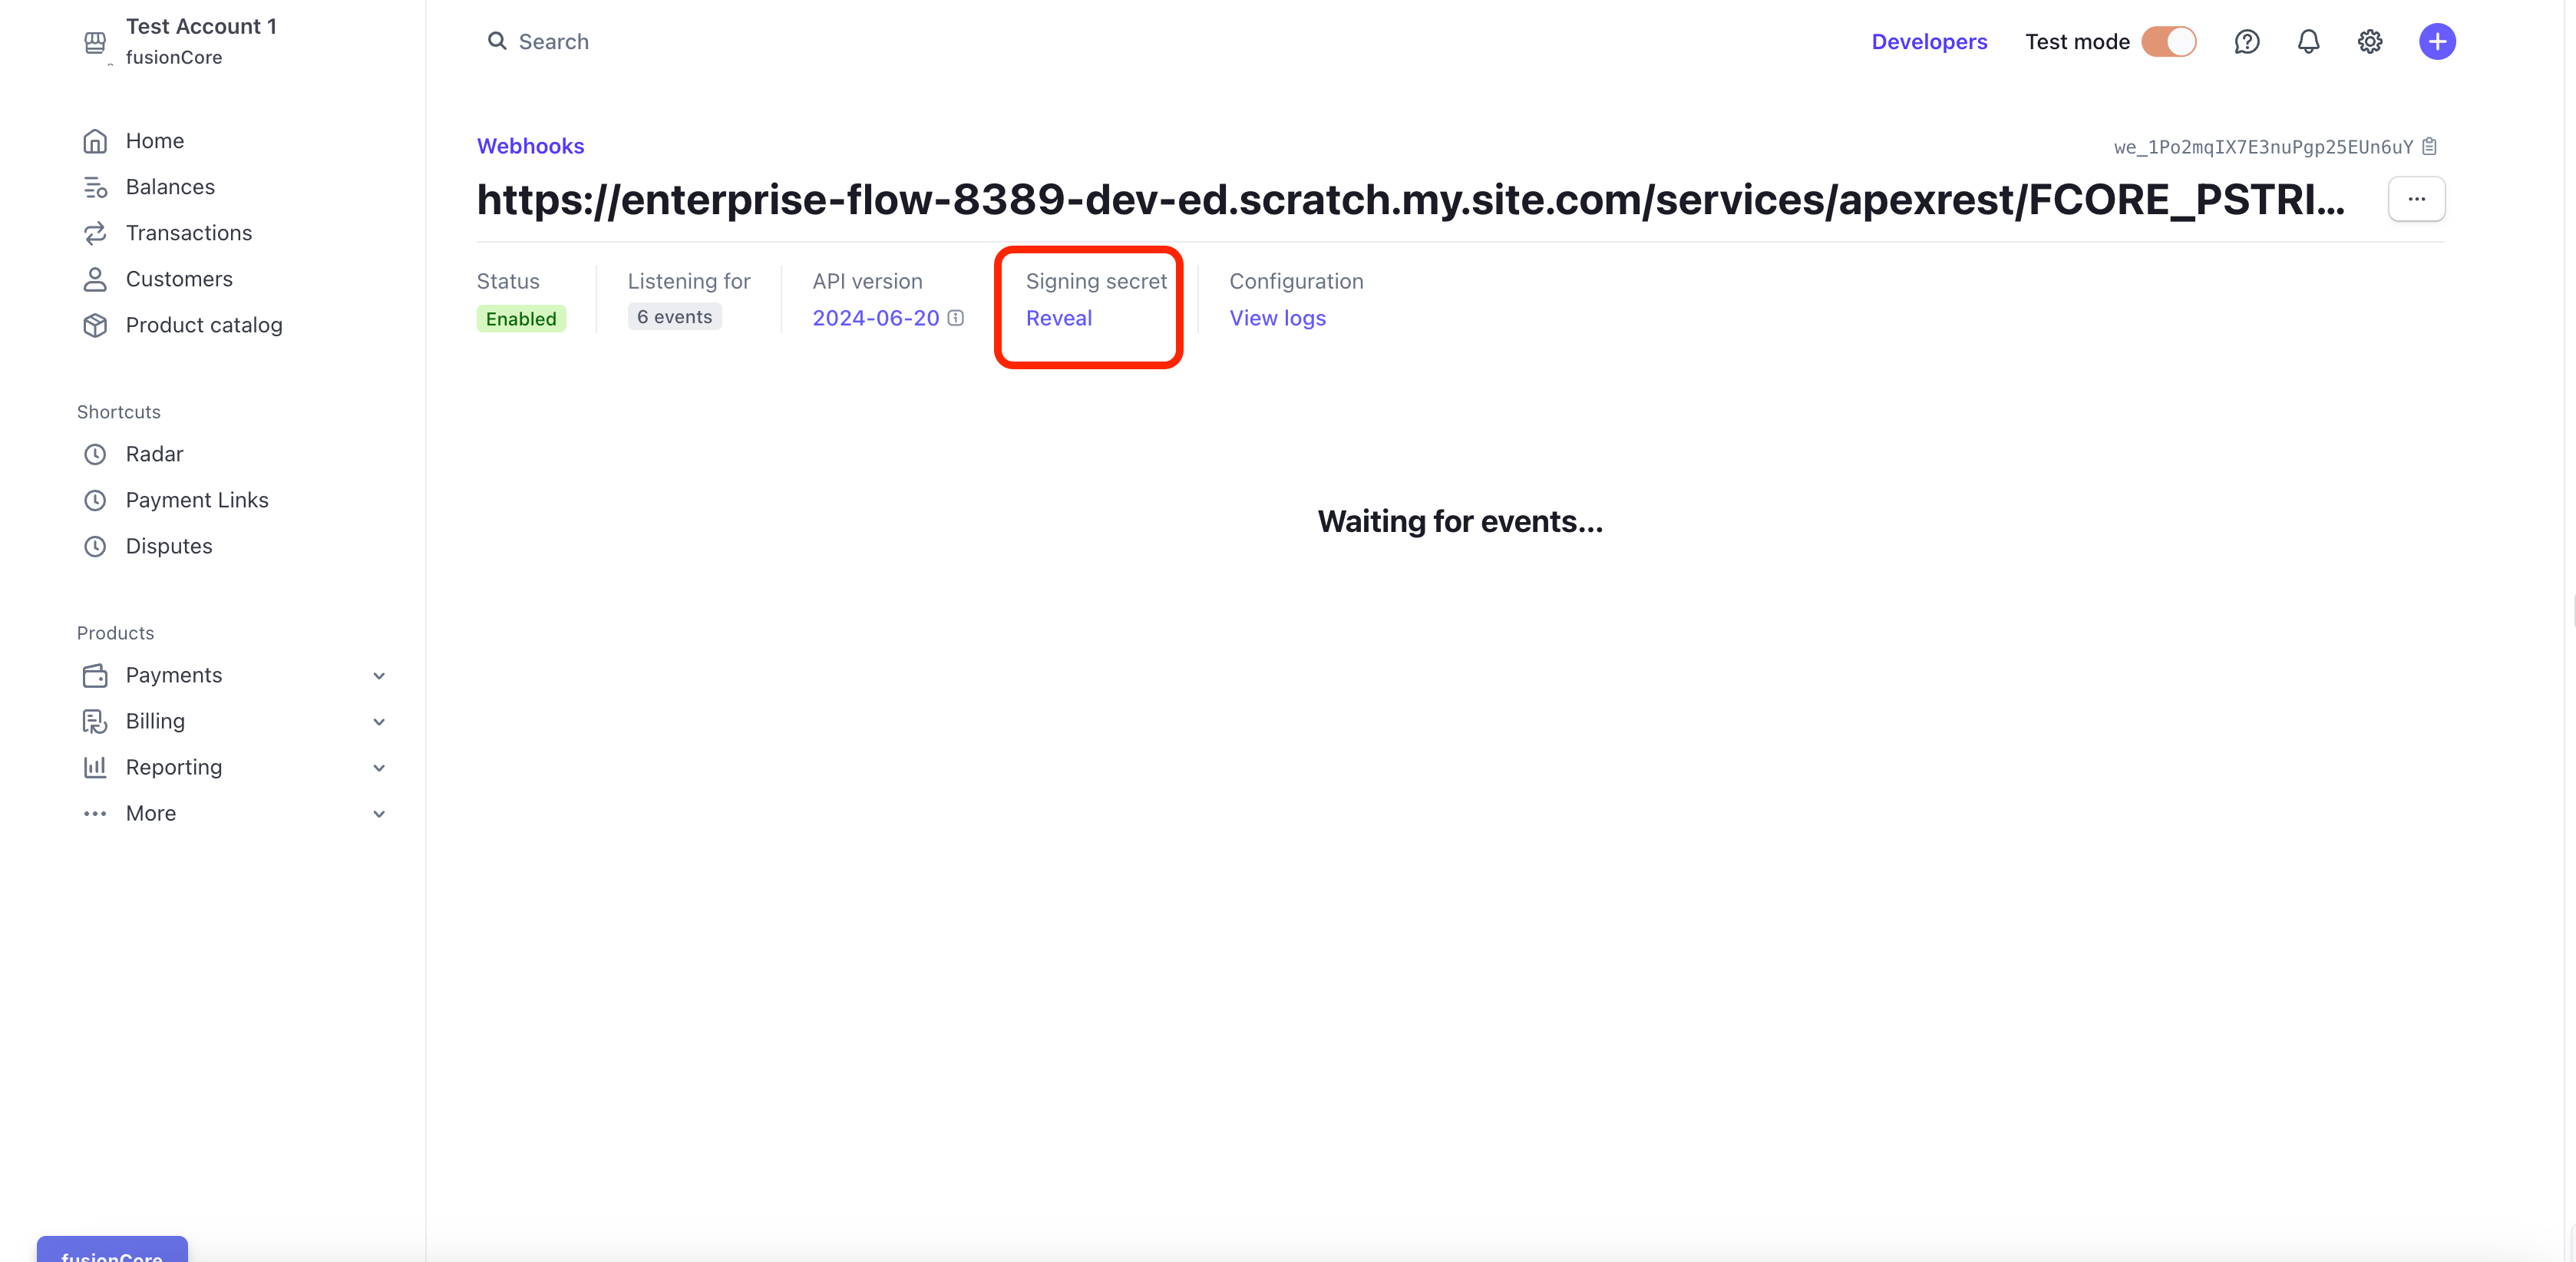
 Open the webhook you just created and copy its **signing secret**. Send it securely to the fusionCore team so they can finish the setup.
 ### Set Up Test Webhooks for Your Salesforce Org
Set up a test webhook so the team can verify the connection without moving real money. Create a separate test webhook for each Salesforce environment you use (production, partial sandbox, full sandbox).
Log into your Stripe account and confirm you are in the correct account at the top left.
Switch on Test mode at the top left: click your **Account**, then **Switch to sandbox**, then **Test mode**.
### Set Up Test Webhooks for Your Salesforce Org
Set up a test webhook so the team can verify the connection without moving real money. Create a separate test webhook for each Salesforce environment you use (production, partial sandbox, full sandbox).
Log into your Stripe account and confirm you are in the correct account at the top left.
Switch on Test mode at the top left: click your **Account**, then **Switch to sandbox**, then **Test mode**.
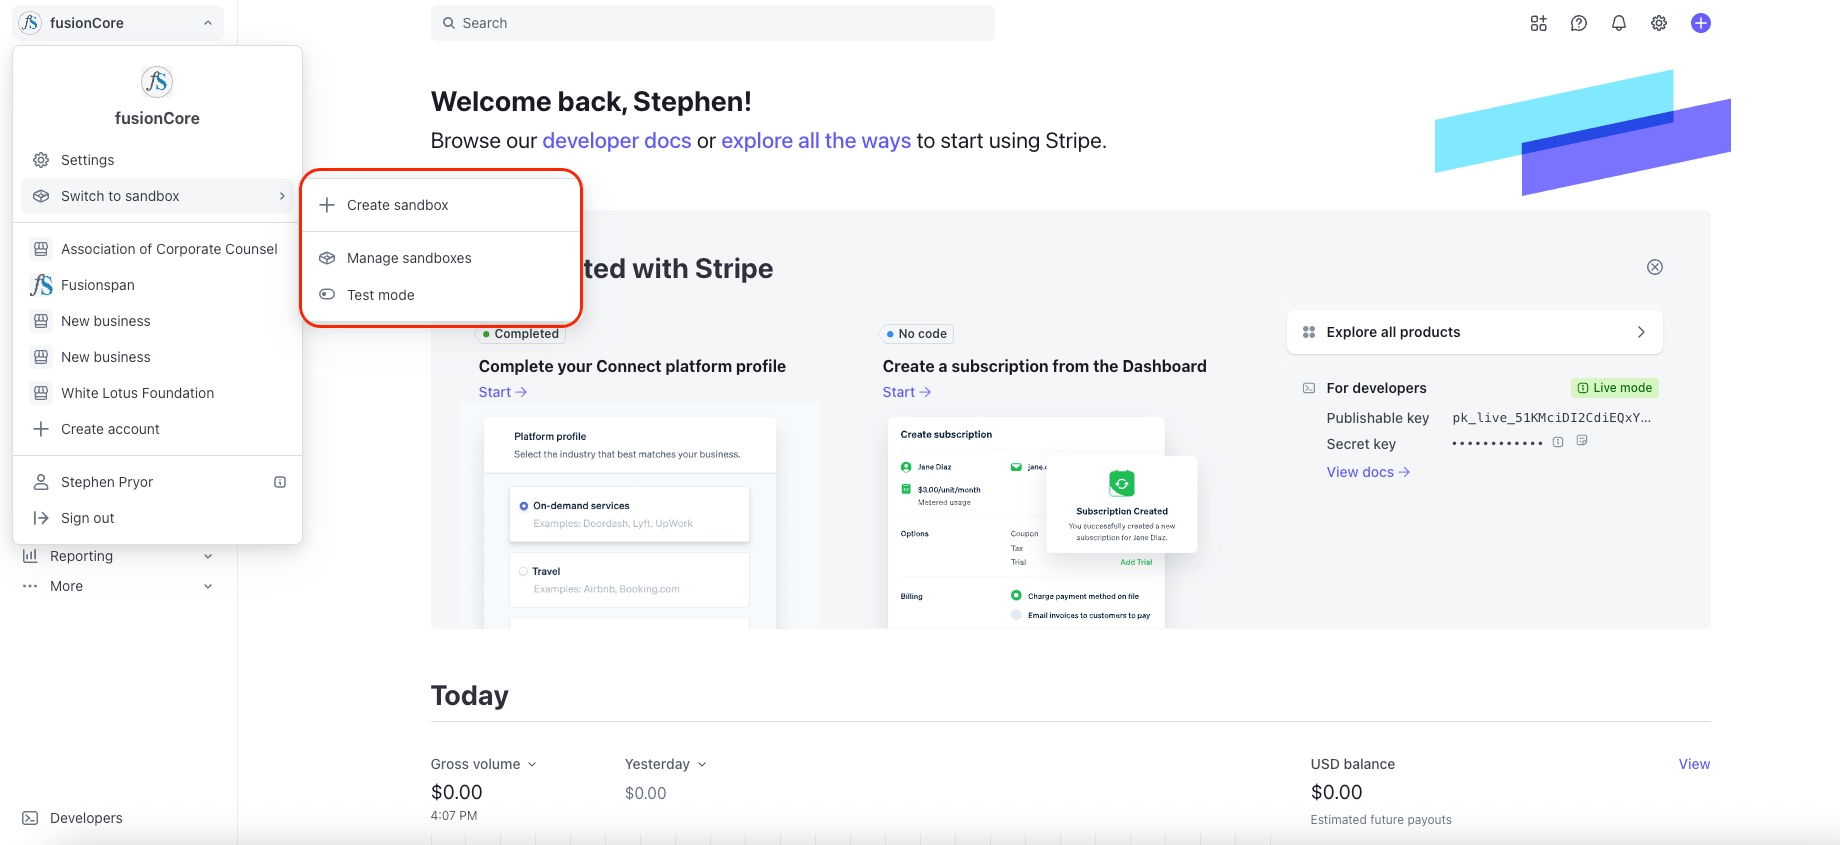 Follow the same steps as [Set Up Live Webhooks](#set-up-live-webhooks-for-your-salesforce-org), this time in Test mode. Use the same endpoint URL and the same 15 events.
## Next Steps
Once the account is fully set up and your live and test webhooks are in place, notify the fusionCore team and hand over the signing secret for each webhook through a secure channel. The team then completes the setup of your Payment Provider Accounts in fusionCore, including [configuring the webhook](/end-user-guides/stripe/connected-account-webhook-set-up) so Stripe can send payment events back into Salesforce.
## Limitations and Common Pitfalls
* **Use the platform account, not the client's account.** Create the connected account from the central **fusionCore Stripe account**. Do not create it from the client's own Stripe account — the webhook and payment flow expect the connected-account model.
* **The link is one-time-use.** The onboarding link can only be used once. If the client loses it or it expires before they finish, generate a new connected account link rather than reusing the old one.
* **Match Test Mode for test accounts.** A connected account created in **Test Mode** is only usable for testing. If you intend to take real payments, create the account while in live mode.
* **Use Card and ACH only on a standard setup.** Configuring Alipay or WeChat Pay on a standard connected-account setup is blocked and validation fails. Those methods require a Stripe Direct account, which the fusionCore team enables before install.
* **Endpoint URL must be exact.** Enter the webhook URL with no extra slashes or spaces, ending in `/services/apexrest/FCORE_PSTRIPE/Stripe`. A wrong URL means events never reach Salesforce, and your account never finishes validating.
* **Validation depends on the webhook.** The fusionCore team validates your Payment Provider Account after the webhook is in place. Validation is not instant — it completes only after Stripe sends the `customer.created` or `customer.updated` event through your webhook. If the webhook is misconfigured, validation never finishes even when your keys are correct.
* **Set the webhook on the correct account.** Set the webhook on your own Stripe account (the one the team is connecting), not on the fusionCore platform account. A webhook on the wrong account can make the Card/ACH payment screen hang on loading.
* **Keep environments separate.** Do not reuse a webhook endpoint or signing secret between production and a sandbox. Set up a separate test webhook per Salesforce environment.
* **Re-send the signing secret if config changes.** If the team later changes key configuration on your Payment Provider Account, validation resets and they re-run it. If you regenerate the webhook signing secret in Stripe, send the new value securely so the connection keeps working.
## Related Features
What the client does after they open the link you send.
Finish the connection by pointing Stripe back at the Salesforce org.
How the connected-account model fits into the full Stripe integration.
{/* Source: https://fusionspan.atlassian.net/wiki/spaces/fcdocs/pages/4491411526 */}
Follow the same steps as [Set Up Live Webhooks](#set-up-live-webhooks-for-your-salesforce-org), this time in Test mode. Use the same endpoint URL and the same 15 events.
## Next Steps
Once the account is fully set up and your live and test webhooks are in place, notify the fusionCore team and hand over the signing secret for each webhook through a secure channel. The team then completes the setup of your Payment Provider Accounts in fusionCore, including [configuring the webhook](/end-user-guides/stripe/connected-account-webhook-set-up) so Stripe can send payment events back into Salesforce.
## Limitations and Common Pitfalls
* **Use the platform account, not the client's account.** Create the connected account from the central **fusionCore Stripe account**. Do not create it from the client's own Stripe account — the webhook and payment flow expect the connected-account model.
* **The link is one-time-use.** The onboarding link can only be used once. If the client loses it or it expires before they finish, generate a new connected account link rather than reusing the old one.
* **Match Test Mode for test accounts.** A connected account created in **Test Mode** is only usable for testing. If you intend to take real payments, create the account while in live mode.
* **Use Card and ACH only on a standard setup.** Configuring Alipay or WeChat Pay on a standard connected-account setup is blocked and validation fails. Those methods require a Stripe Direct account, which the fusionCore team enables before install.
* **Endpoint URL must be exact.** Enter the webhook URL with no extra slashes or spaces, ending in `/services/apexrest/FCORE_PSTRIPE/Stripe`. A wrong URL means events never reach Salesforce, and your account never finishes validating.
* **Validation depends on the webhook.** The fusionCore team validates your Payment Provider Account after the webhook is in place. Validation is not instant — it completes only after Stripe sends the `customer.created` or `customer.updated` event through your webhook. If the webhook is misconfigured, validation never finishes even when your keys are correct.
* **Set the webhook on the correct account.** Set the webhook on your own Stripe account (the one the team is connecting), not on the fusionCore platform account. A webhook on the wrong account can make the Card/ACH payment screen hang on loading.
* **Keep environments separate.** Do not reuse a webhook endpoint or signing secret between production and a sandbox. Set up a separate test webhook per Salesforce environment.
* **Re-send the signing secret if config changes.** If the team later changes key configuration on your Payment Provider Account, validation resets and they re-run it. If you regenerate the webhook signing secret in Stripe, send the new value securely so the connection keeps working.
## Related Features
What the client does after they open the link you send.
Finish the connection by pointing Stripe back at the Salesforce org.
How the connected-account model fits into the full Stripe integration.
{/* Source: https://fusionspan.atlassian.net/wiki/spaces/fcdocs/pages/4491411526 */}