> ## Documentation Index
> Fetch the complete documentation index at: https://docs.fusioncore.us/llms.txt
> Use this file to discover all available pages before exploring further.
# Simple Conditions
> Build no-code eligibility and pricing logic with Simple Conditions and their Condition Lines, then attach them to price books, tax products, or renewal paths.
## Overview
Simple Conditions leverage Condition Lines for their logic and can handle less complex use cases. They can be created by an admin user or a standard user in the Salesforce user interface.
A Simple Condition has two parts: the **Condition** record itself, and the **Condition Lines** that hold its no-code logic. Create the Condition record first, then add its lines.
## Create a Simple Condition
Enter the appropriate **Simple Condition information**:
* **Name**
* **Record/Product Connection**
* **Record Logic**
* **Record Custom Logic** — only required if you choose Custom for **Record Logic**
* **Description**
Click **Save**.
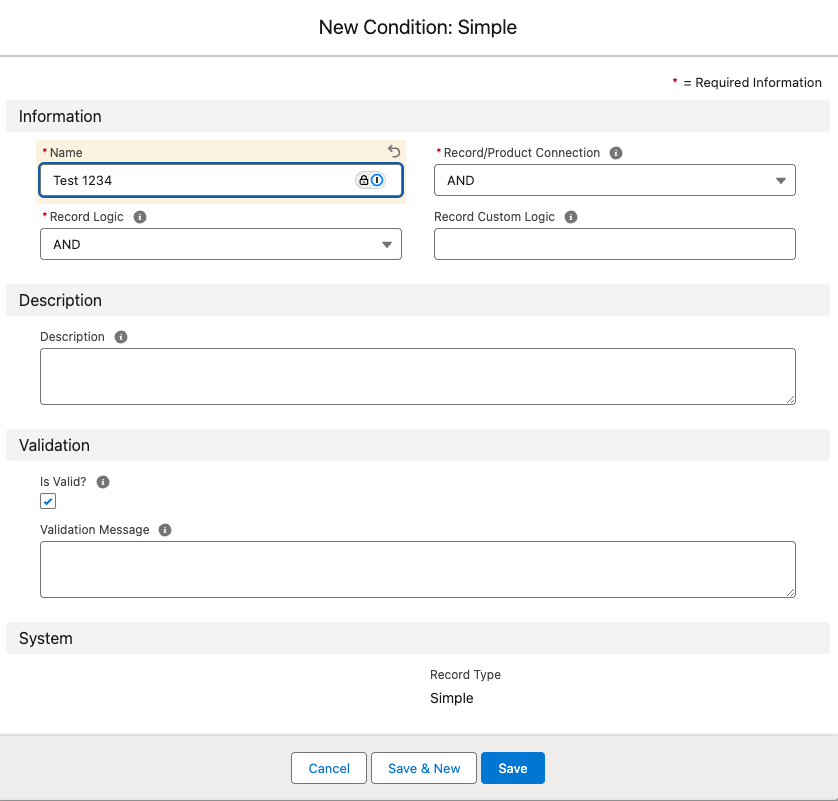 Once the Simple Condition has been created, add its **Condition Lines** — see [Condition Lines](#condition-lines) below.
Once your condition records have been created, add them to a [Price Book](/end-user-guides/products/product-set-up/price-books), a [Tax Product](/end-user-guides/products/taxes/index), or a [Renewal Path](/end-user-guides/subscriptions/subscription-renewal/renewal-paths). To configure conditions specifically for taxes, refer to the [Taxes End User Guide](/end-user-guides/products/taxes/index) for setting up tax-related condition lines.
## Condition Lines
Condition lines are the criteria that drive a Simple Condition's logic. Each line evaluates a field, value, and operator to decide whether a pricing or business rule applies, so membership, event registration, sponsorship, and other services align with your organization's policies.
* **Definition:** detailed criteria determining when a pricing or business rule applies.
* **Combination:** multiple condition lines can be combined with logical operators (AND/OR) to define complex scenarios.
* **Application:** applied to pricing rules, product configurations, discounting, or quote logic.
Here are some examples of how you might use Condition Lines for your organization:
* **Membership Discount Rules:** Members get discounted pricing for conference registration.
* Condition Lines:
* Field: `Account Membership Type`\
Operator: `Equals`\
Value: `Member`
* Field: `Product`\
Operator: `Equals`\
Value: `Conference Registration`
* Logical Operator: `AND`
* **Early Bird Event Pricing:** Discounted rates apply for registrations before a specific date.
* Condition Lines:
* Field: `Registration Date`\
Operator: `Less Than`\
Value: `2025-03-01`
* Field: `Event Type`\
Operator: `Equals`\
Value: `Annual Conference`
* Logical Operator: `AND`
* **Bulk Discounts for Group Purchases:** Discounts apply if more than 10 event tickets are purchased.
* Condition Lines:
* Field: `Quantity`\
Operator: `Greater Than`\
Value: `10`
* Field: `Product`\
Operator: `Equals`\
Value: `Event Ticket`
* Logical Operator: `AND`
### Add Condition Lines
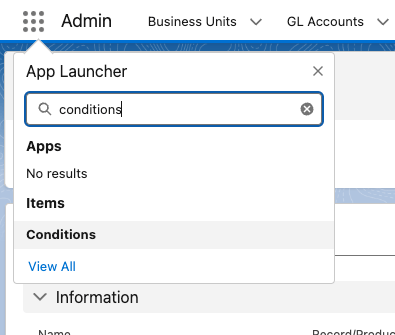
Click the **App Launcher** and type in **Conditions**.
* The App Launcher is the nine dots at the top left-hand side.
Once the Simple Condition has been created, add its **Condition Lines** — see [Condition Lines](#condition-lines) below.
Once your condition records have been created, add them to a [Price Book](/end-user-guides/products/product-set-up/price-books), a [Tax Product](/end-user-guides/products/taxes/index), or a [Renewal Path](/end-user-guides/subscriptions/subscription-renewal/renewal-paths). To configure conditions specifically for taxes, refer to the [Taxes End User Guide](/end-user-guides/products/taxes/index) for setting up tax-related condition lines.
## Condition Lines
Condition lines are the criteria that drive a Simple Condition's logic. Each line evaluates a field, value, and operator to decide whether a pricing or business rule applies, so membership, event registration, sponsorship, and other services align with your organization's policies.
* **Definition:** detailed criteria determining when a pricing or business rule applies.
* **Combination:** multiple condition lines can be combined with logical operators (AND/OR) to define complex scenarios.
* **Application:** applied to pricing rules, product configurations, discounting, or quote logic.
Here are some examples of how you might use Condition Lines for your organization:
* **Membership Discount Rules:** Members get discounted pricing for conference registration.
* Condition Lines:
* Field: `Account Membership Type`\
Operator: `Equals`\
Value: `Member`
* Field: `Product`\
Operator: `Equals`\
Value: `Conference Registration`
* Logical Operator: `AND`
* **Early Bird Event Pricing:** Discounted rates apply for registrations before a specific date.
* Condition Lines:
* Field: `Registration Date`\
Operator: `Less Than`\
Value: `2025-03-01`
* Field: `Event Type`\
Operator: `Equals`\
Value: `Annual Conference`
* Logical Operator: `AND`
* **Bulk Discounts for Group Purchases:** Discounts apply if more than 10 event tickets are purchased.
* Condition Lines:
* Field: `Quantity`\
Operator: `Greater Than`\
Value: `10`
* Field: `Product`\
Operator: `Equals`\
Value: `Event Ticket`
* Logical Operator: `AND`
### Add Condition Lines
Click the **App Launcher** and type in **Conditions**.
* The App Launcher is the nine dots at the top left-hand side.
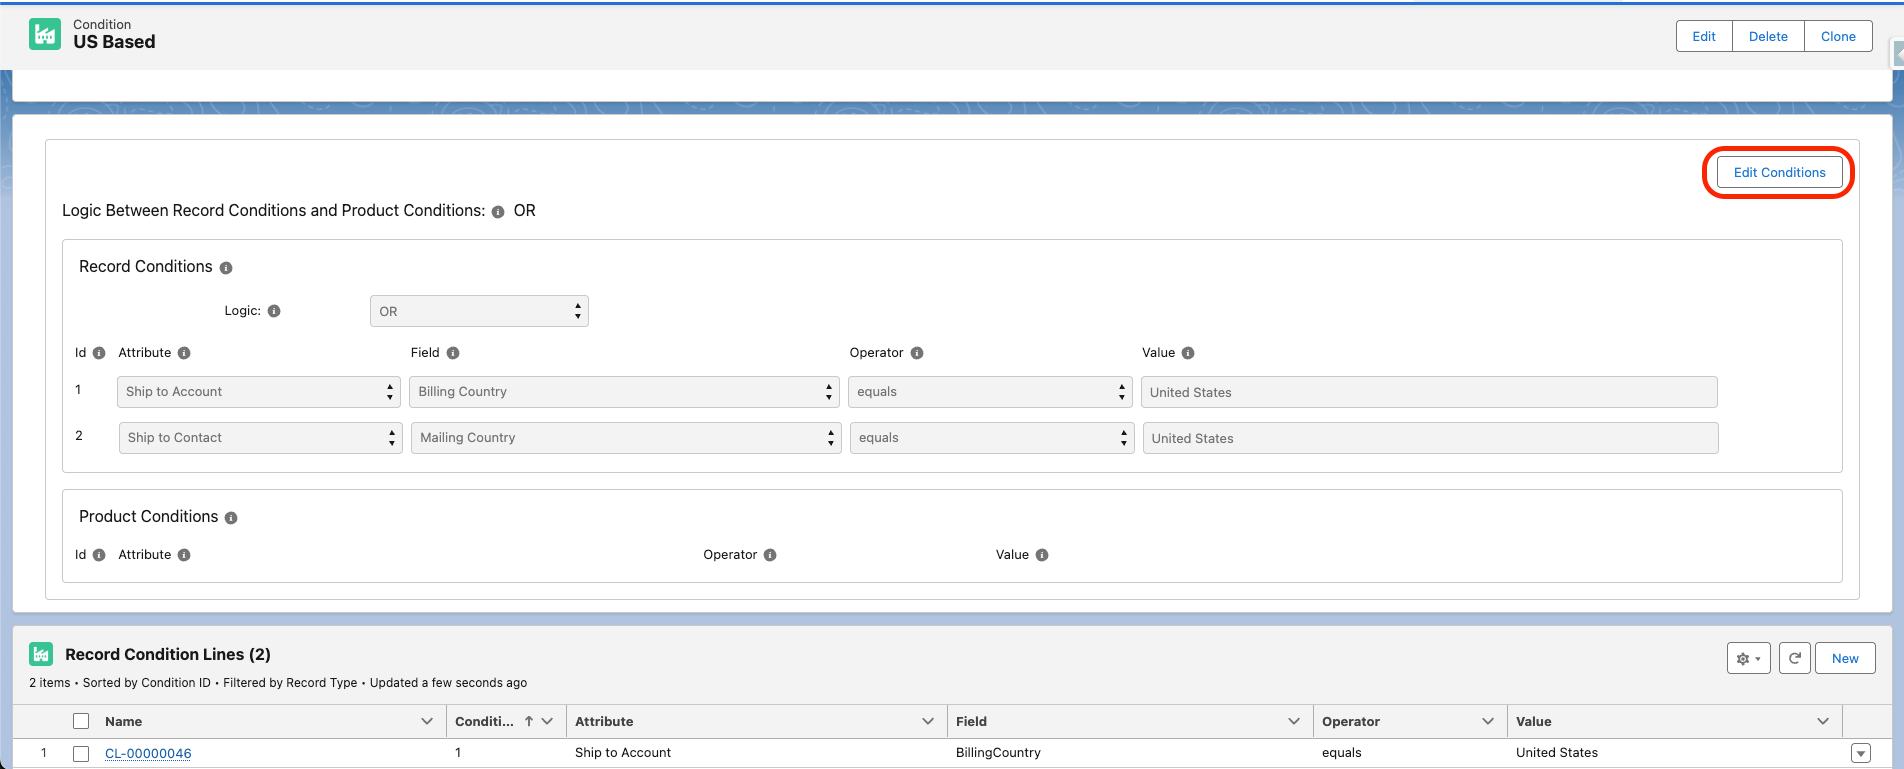
 Choose a **Condition**, scroll down to the Condition Lines component, and click **Edit Conditions**.
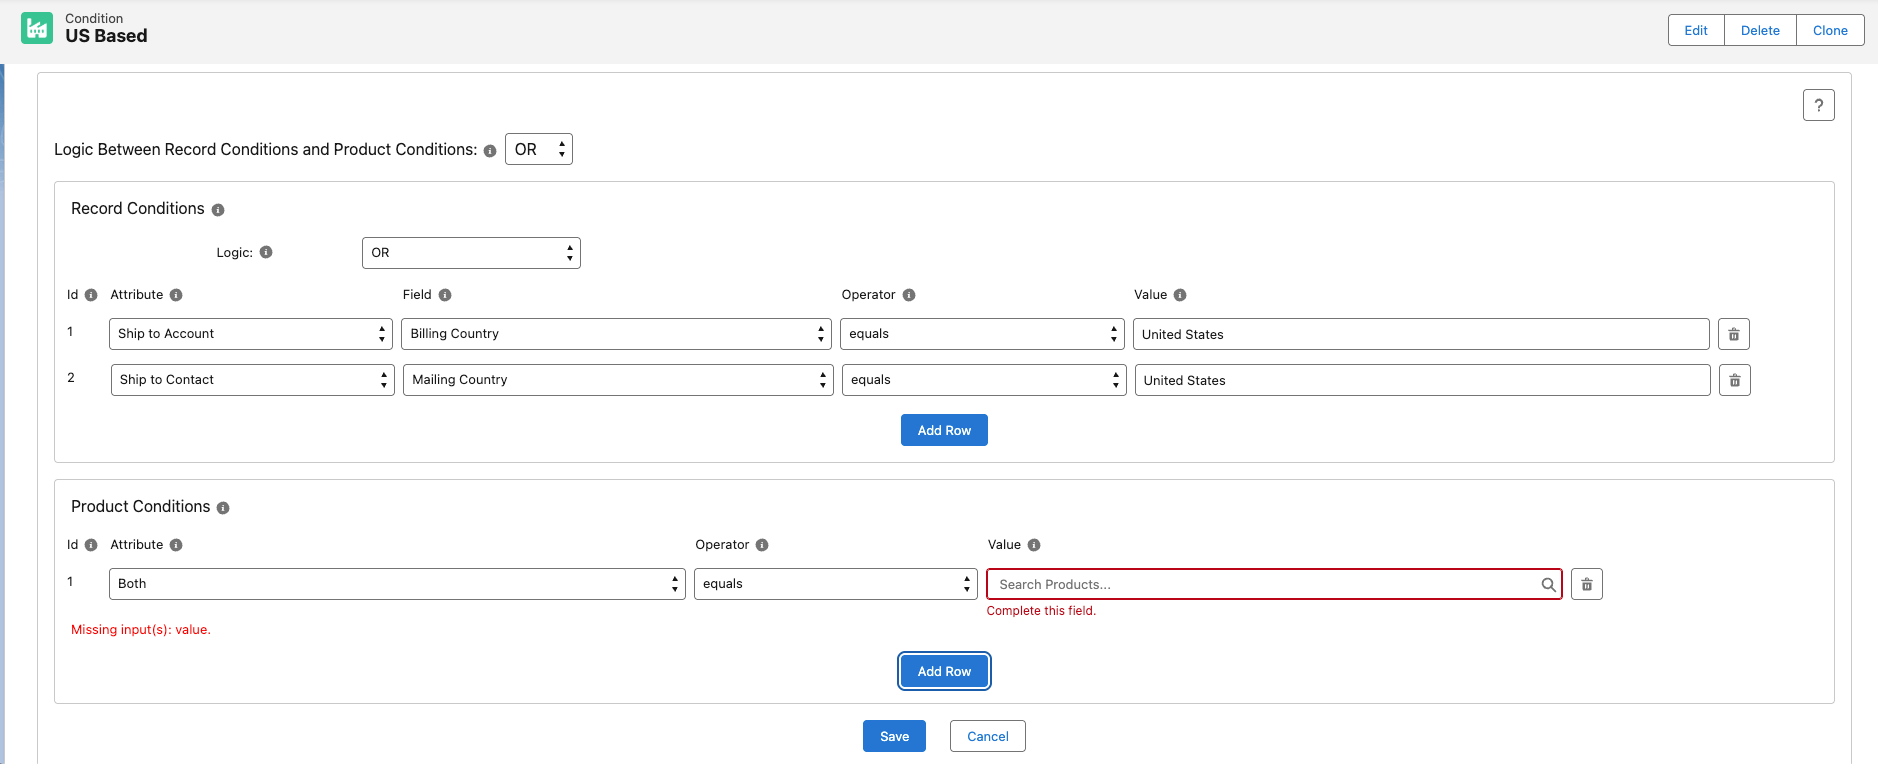
 From here, you can freely add or remove condition lines by clicking **Add Row** for either Record or Product Conditions.
 ### Condition Line Fields
* **Attribute** - What the Condition Line looks at when evaluating
* For Product Conditions, the Attributes are **Owned**, **In Cart**, or **Owned/In Cart**
* Owned looks at Purchase Activities related to the current customer for the Product
* In Cart looks at whether the Product is in the current cart
* Owned/In Cart looks at either
* For Record Conditions, the Attributes are **Order**, **Opportunity**, **Ship to Account**, and **Ship to Contact**
* Order and Opportunity are best for use cases such as taxes
* These look at the related Order or Opportunity
* Ship to Account and Ship to Contact are best for use cases such as location-based pricing
* These look at the Account or Contact the order ships to
* **Field** - The field on the Attribute that you wish to evaluate
* Only for Record Condition Lines
* **Operator** - How the Condition will evaluate. Things such as Equals, Not Equals, Greater Than, Less Than, etc.
* **Value** - That for which you want to evaluate the Condition Line
The **Record/Product Connection** setting on the Condition controls how the Record condition lines and the Product condition lines are combined: **AND** requires both groups to pass, while **OR** requires only one of them. If you configure just one group of lines (only Record, or only Product), either setting works — the group you leave empty is ignored.
## Limitations and Common Pitfalls
* **Product condition lines are always combined with OR.** You cannot require multiple Product condition lines together with AND; only Record condition lines honor the **Record Logic** setting (AND / OR / Custom).
* **The Record/Product Connection only matters when both groups exist.** AND vs OR between the Record and Product groups only changes the outcome when you have configured both kinds of lines.
### Condition Line Fields
* **Attribute** - What the Condition Line looks at when evaluating
* For Product Conditions, the Attributes are **Owned**, **In Cart**, or **Owned/In Cart**
* Owned looks at Purchase Activities related to the current customer for the Product
* In Cart looks at whether the Product is in the current cart
* Owned/In Cart looks at either
* For Record Conditions, the Attributes are **Order**, **Opportunity**, **Ship to Account**, and **Ship to Contact**
* Order and Opportunity are best for use cases such as taxes
* These look at the related Order or Opportunity
* Ship to Account and Ship to Contact are best for use cases such as location-based pricing
* These look at the Account or Contact the order ships to
* **Field** - The field on the Attribute that you wish to evaluate
* Only for Record Condition Lines
* **Operator** - How the Condition will evaluate. Things such as Equals, Not Equals, Greater Than, Less Than, etc.
* **Value** - That for which you want to evaluate the Condition Line
The **Record/Product Connection** setting on the Condition controls how the Record condition lines and the Product condition lines are combined: **AND** requires both groups to pass, while **OR** requires only one of them. If you configure just one group of lines (only Record, or only Product), either setting works — the group you leave empty is ignored.
## Limitations and Common Pitfalls
* **Product condition lines are always combined with OR.** You cannot require multiple Product condition lines together with AND; only Record condition lines honor the **Record Logic** setting (AND / OR / Custom).
* **The Record/Product Connection only matters when both groups exist.** AND vs OR between the Record and Product groups only changes the outcome when you have configured both kinds of lines.