> ## Documentation Index
> Fetch the complete documentation index at: https://docs.fusioncore.us/llms.txt
> Use this file to discover all available pages before exploring further.
# Install and Set Up fusionCore
> Configure your Salesforce org, install the fusionCore packages, and complete the post-install setup.
This page walks you through preparing a Salesforce org for fusionCore, installing the packages in order, and completing the post-install configuration. The steps are written for an admin or implementer setting up a new org. Most steps below begin from **Setup**.
## Prerequisites
**Complete every prerequisite before you install any packages.**
### Custom Address Fields
Custom Address Fields let Salesforce store addresses as a single, structured field. fusionCore relies on them.
In **Setup**, type `User Interface` in the **Quick Find** box. The results show a parent menu and a clickable submenu item, both named **User Interface**. Click the submenu **User Interface** item (the clickable page).
Check **Use Custom Address Fields**.
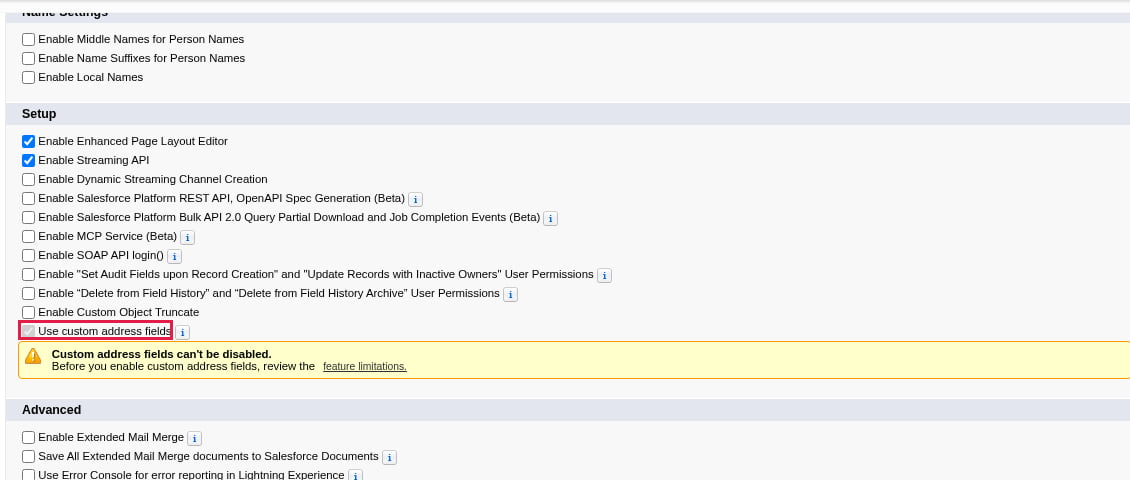 Click **Save**.
[Salesforce Help - Enable Custom Address Fields](https://help.salesforce.com/s/articleView?id=sf.fields_caf_enable.htm\&type=5)
### State and Country Picklists
State and Country/Territory picklists replace free-text state and country fields with standardized, selectable values.
In **Setup**, type `State and Country/Territory Picklists` in the **Quick Find** box. Click **Configure States, Countries, and Territories**, adjust the mappings as needed, then click **Save**.
Go back to the **State and Country/Territory Picklists** setup page. Click **Scan for state and country/territory data** and wait for the scan to finish.
Click **Save**.
[Salesforce Help - Enable Custom Address Fields](https://help.salesforce.com/s/articleView?id=sf.fields_caf_enable.htm\&type=5)
### State and Country Picklists
State and Country/Territory picklists replace free-text state and country fields with standardized, selectable values.
In **Setup**, type `State and Country/Territory Picklists` in the **Quick Find** box. Click **Configure States, Countries, and Territories**, adjust the mappings as needed, then click **Save**.
Go back to the **State and Country/Territory Picklists** setup page. Click **Scan for state and country/territory data** and wait for the scan to finish.
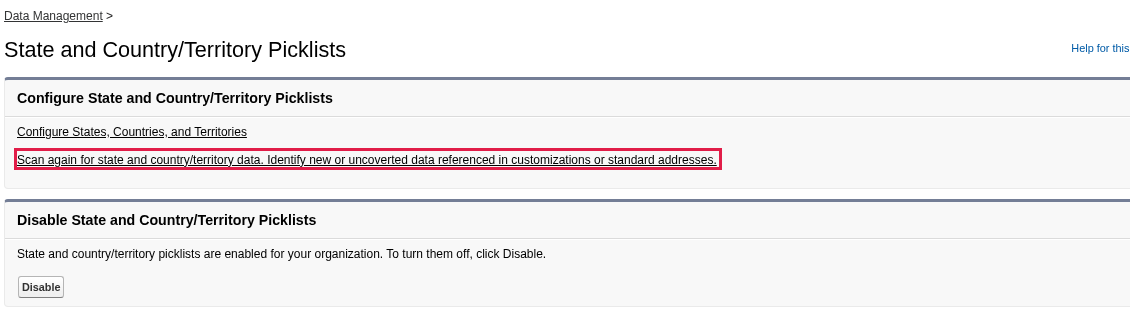 If your org already has the picklists enabled, this link reads **Scan again for state and country/territory data**.
Go back to the **State and Country/Territory Picklists** setup page, then click **Convert identified data**.
Map any **Country/Territory** values that do not match to a picklist option. Select which value to change, set **Change To**, then click **Save to Changelist** and click **Next**.
Repeat the previous step for **States**, then click **Next**.
Click **Finish and Enable Picklists**. This process takes a few minutes. When it completes, refresh the browser.
You may see alerts that say "You cannot disable while a deployment is in progress" and "Enabling or disabling state and country/territory picklists can cause performance issues. For best user experience, make this change during off-peak hours."
[Salesforce Help - Enabling State and Country Picklists](https://help.salesforce.com/s/articleView?id=sf.admin_state_country_picklist_enable.htm\&type=5)
### **Person Accounts enablement (If applicable)**
if you are working on an implementation that involves Person Accounts (for example, working in an NPC org), then you will need to ensure that Person Accounts are enabled. The steps for doing so can be found [here](https://app.mintlify.com/fusionspan/fusionspan/editor/Stephen-Edits/~/b359d88c-8f99-407f-a33f-2b6b13e23108 "https://fusionspan.atlassian.net/wiki/x/4Q6YSAE")**.**
Make absolutely sure that you are ready to enable this feature before doing so.
### **Multi-currency enablement (If applicable)**
if you are working on an implementation that involves multi-currency, then you will need to ensure that multi-currency are enabled. The steps for doing so can be found [here](https://app.mintlify.com/fusionspan/fusionspan/editor/Stephen-Edits/~/86755d92-2824-4aef-978a-d9bcbde07572 "https://fusionspan.atlassian.net/wiki/spaces/fcdocs/pages/5512889704")**.**
Make absolutely sure that you are ready to enable this feature before doing so.
## Install the Packages
fusionCore is delivered as several packages that you install in a set order.
The fusionCore team provides the current installation URL and installation key for each package. **Install them in this order:**
1. Platform (Managed)
2. Commerce (Managed)
3. Subscriptions (Managed)
4. Stripe (Managed)
5. Portal (Managed)
6. Financial Period Reports (Unmanaged)
7. Financial Documents (Unmanaged)
8. Portal Components (Unmanaged)
9. Committees (Unmanaged)
10. Layouts (Unmanaged)
11. Reports (Unmanaged)
12. Rest APIs
13. Person Account Layouts (Unmanaged)(**ONLY if Person Accounts enabled**)
These **must** be installed in the order listed above, or else you may run into installation errors.
### Manually Installing Packages
Log into your Salesforce org. Take the package installation URL provided by the fusionCore team and paste it after your org's domain in the browser address bar. The full URL looks like this:
`https://.lightning.force.com/packaging/installPackage.apexp?p0=`
Replace `` with your org's domain. The `` and the matching installation key are supplied by the fusionCore team for each package.
Press **Enter** to load the package installation page, then copy and paste the installation key for the package.
Select **Install for Admins Only**, select **Acknowledge**, then click **Install**.
**Never** choose **Install for All Users** — it overwrites profiles. Always use **Install for Admins Only**.
Installation will usually take a few minutes. You can track installation progress under **Deployment Settings** in Setup
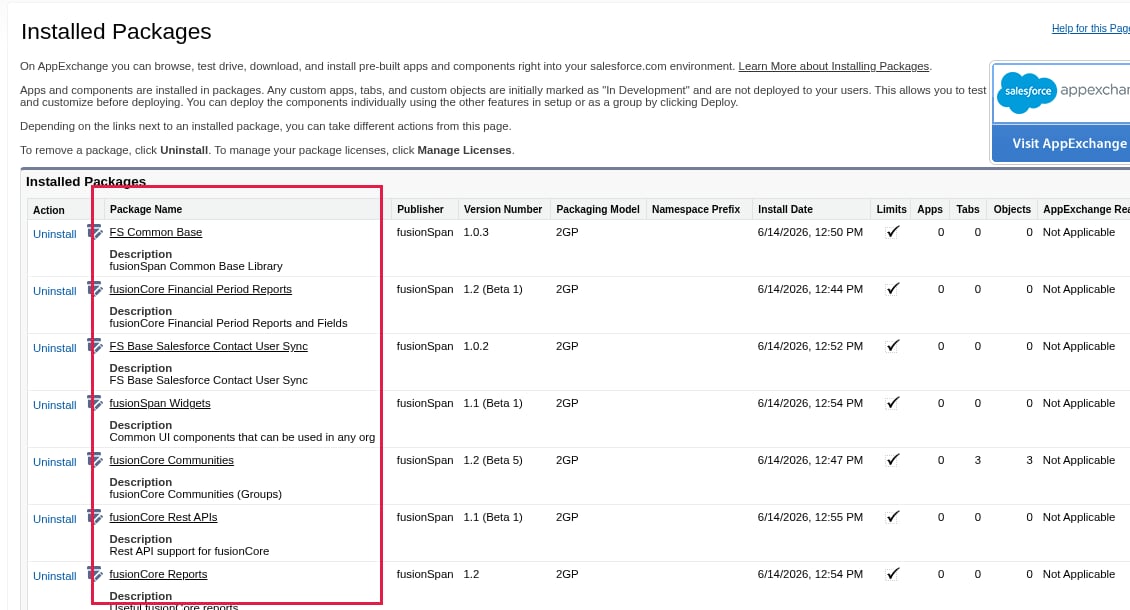
To confirm an install succeeded, open **Installed Packages** in **Setup**. The fusionCore packages appear in the list.
If your org already has the picklists enabled, this link reads **Scan again for state and country/territory data**.
Go back to the **State and Country/Territory Picklists** setup page, then click **Convert identified data**.
Map any **Country/Territory** values that do not match to a picklist option. Select which value to change, set **Change To**, then click **Save to Changelist** and click **Next**.
Repeat the previous step for **States**, then click **Next**.
Click **Finish and Enable Picklists**. This process takes a few minutes. When it completes, refresh the browser.
You may see alerts that say "You cannot disable while a deployment is in progress" and "Enabling or disabling state and country/territory picklists can cause performance issues. For best user experience, make this change during off-peak hours."
[Salesforce Help - Enabling State and Country Picklists](https://help.salesforce.com/s/articleView?id=sf.admin_state_country_picklist_enable.htm\&type=5)
### **Person Accounts enablement (If applicable)**
if you are working on an implementation that involves Person Accounts (for example, working in an NPC org), then you will need to ensure that Person Accounts are enabled. The steps for doing so can be found [here](https://app.mintlify.com/fusionspan/fusionspan/editor/Stephen-Edits/~/b359d88c-8f99-407f-a33f-2b6b13e23108 "https://fusionspan.atlassian.net/wiki/x/4Q6YSAE")**.**
Make absolutely sure that you are ready to enable this feature before doing so.
### **Multi-currency enablement (If applicable)**
if you are working on an implementation that involves multi-currency, then you will need to ensure that multi-currency are enabled. The steps for doing so can be found [here](https://app.mintlify.com/fusionspan/fusionspan/editor/Stephen-Edits/~/86755d92-2824-4aef-978a-d9bcbde07572 "https://fusionspan.atlassian.net/wiki/spaces/fcdocs/pages/5512889704")**.**
Make absolutely sure that you are ready to enable this feature before doing so.
## Install the Packages
fusionCore is delivered as several packages that you install in a set order.
The fusionCore team provides the current installation URL and installation key for each package. **Install them in this order:**
1. Platform (Managed)
2. Commerce (Managed)
3. Subscriptions (Managed)
4. Stripe (Managed)
5. Portal (Managed)
6. Financial Period Reports (Unmanaged)
7. Financial Documents (Unmanaged)
8. Portal Components (Unmanaged)
9. Committees (Unmanaged)
10. Layouts (Unmanaged)
11. Reports (Unmanaged)
12. Rest APIs
13. Person Account Layouts (Unmanaged)(**ONLY if Person Accounts enabled**)
These **must** be installed in the order listed above, or else you may run into installation errors.
### Manually Installing Packages
Log into your Salesforce org. Take the package installation URL provided by the fusionCore team and paste it after your org's domain in the browser address bar. The full URL looks like this:
`https://.lightning.force.com/packaging/installPackage.apexp?p0=`
Replace `` with your org's domain. The `` and the matching installation key are supplied by the fusionCore team for each package.
Press **Enter** to load the package installation page, then copy and paste the installation key for the package.
Select **Install for Admins Only**, select **Acknowledge**, then click **Install**.
**Never** choose **Install for All Users** — it overwrites profiles. Always use **Install for Admins Only**.
Installation will usually take a few minutes. You can track installation progress under **Deployment Settings** in Setup
To confirm an install succeeded, open **Installed Packages** in **Setup**. The fusionCore packages appear in the list.
 ## Post-install Setup
### Assign Permission Sets
In **Setup**, type `Permission Sets Groups` in the **Quick Find** box, then select **Permission Sets**.
Choose the permission set group to assign. Assign these groups to the matching users:
* **Accounting User** - for accounting staff users
* **Standard User** - for standard staff users
* **Integration User** - for all users paying with Stripe
* **Portal User** - for portal users
Click **Manage Assignments**, then select **Add Assignments**.
## Post-install Setup
### Assign Permission Sets
In **Setup**, type `Permission Sets Groups` in the **Quick Find** box, then select **Permission Sets**.
Choose the permission set group to assign. Assign these groups to the matching users:
* **Accounting User** - for accounting staff users
* **Standard User** - for standard staff users
* **Integration User** - for all users paying with Stripe
* **Portal User** - for portal users
Click **Manage Assignments**, then select **Add Assignments**.
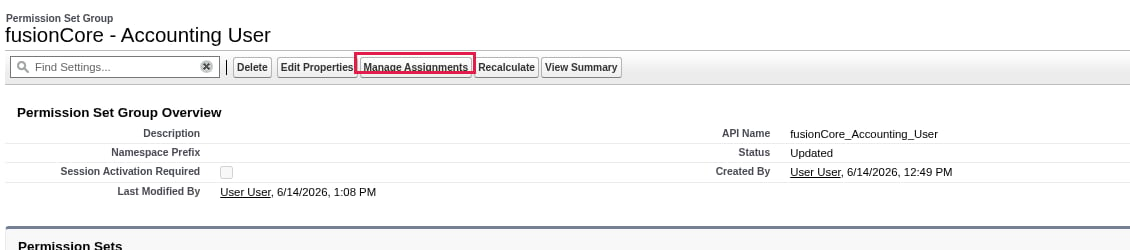 Choose the users to assign the permission set group to, click **Assign**, then select **Done**. Repeat for each permission set group above.
### Assign Layouts and Compact Layouts
Assign both the **page layout** and the **compact layout** to the appropriate profiles for every object you plan to configure.
* Account
* Contact
* Benefit Allocation `FCORE_PAY__Benefit_Allocation__c`
* Business Unit `FCORE_PAY__Business_Unit__c`
* Community `FS_Community__c`
* Community Member `FS_Community_Member__c`
* Community Position `FS_Community_Position__c`
* Condition `FCORE_PAY__Condition__c`
* Condition Line `FCORE_PAY__Condition_Line__c`
* Credit `FCORE_PAY__Credit__c`
* Discount Code `FCORE_PAY__Discount_Code__c`
* Product Discount Code `FCORE_PAY__Product_Discount_Code__c`
* Financial Event `FCORE_PAY__Financial_Event__c`
* Financial Event Line `FCORE_PAY__Financial_Event_Line__c`
* Financial Period `FCORE_PAY__Financial_Period__c`
* GL Account `FCORE_PAY__GL_Account__c`
* Log `FCORE_BASE__Log__c`
* Opportunity
* Opportunity Product `OpportunityLineItem`
* Order
* Order Product `OrderItem`
* Payment Provider Account `Payment_Provider_Account__c`
* Payment Provider Customer `Payment_Provider_Customer__c`
* Payment Provider Event `Payment_Provider_Event__c`
* Payment Provider Event Line `Payment_Provider_Event_Line__c`
* Payment Type `Payment_Type__c`
* Pricebook `Pricebook2`
* Product Category `FCORE_PAY__Product_Category__c`
* Product Category Item `FCORE_PAY__Product_Category_Item__c`
* Product Subscription Plan `FCORE_MEM__Product_Subscription_Plan__c`
* Product `Product2`
* Purchase Activity `FCORE_PAY__Purchase_Activity__c`
* Renewal Path `FCORE_MEM__Renewal_Path__c`
* Subscription Plan `FCORE_MEM__Subscription_Plan__c`
* Stripe API Log `FCORE_PSTRIPE__Stripe_API_Log__c`
* Wallet Item `FCORE_PAY__Wallet_Item__c`
In **Setup**, select **Object Manager**. Click the label of the relevant object (for example, **Account**). Object Manager has its own **Quick Find** box near the top-right corner that you can use to search for an object by name.
In the left panel, click **Page Layouts**, then click **Page Layout Assignments** and click **Edit Assignment**. For each record type, select the column and apply the appropriate layout, then click **Save**.
Choose the users to assign the permission set group to, click **Assign**, then select **Done**. Repeat for each permission set group above.
### Assign Layouts and Compact Layouts
Assign both the **page layout** and the **compact layout** to the appropriate profiles for every object you plan to configure.
* Account
* Contact
* Benefit Allocation `FCORE_PAY__Benefit_Allocation__c`
* Business Unit `FCORE_PAY__Business_Unit__c`
* Community `FS_Community__c`
* Community Member `FS_Community_Member__c`
* Community Position `FS_Community_Position__c`
* Condition `FCORE_PAY__Condition__c`
* Condition Line `FCORE_PAY__Condition_Line__c`
* Credit `FCORE_PAY__Credit__c`
* Discount Code `FCORE_PAY__Discount_Code__c`
* Product Discount Code `FCORE_PAY__Product_Discount_Code__c`
* Financial Event `FCORE_PAY__Financial_Event__c`
* Financial Event Line `FCORE_PAY__Financial_Event_Line__c`
* Financial Period `FCORE_PAY__Financial_Period__c`
* GL Account `FCORE_PAY__GL_Account__c`
* Log `FCORE_BASE__Log__c`
* Opportunity
* Opportunity Product `OpportunityLineItem`
* Order
* Order Product `OrderItem`
* Payment Provider Account `Payment_Provider_Account__c`
* Payment Provider Customer `Payment_Provider_Customer__c`
* Payment Provider Event `Payment_Provider_Event__c`
* Payment Provider Event Line `Payment_Provider_Event_Line__c`
* Payment Type `Payment_Type__c`
* Pricebook `Pricebook2`
* Product Category `FCORE_PAY__Product_Category__c`
* Product Category Item `FCORE_PAY__Product_Category_Item__c`
* Product Subscription Plan `FCORE_MEM__Product_Subscription_Plan__c`
* Product `Product2`
* Purchase Activity `FCORE_PAY__Purchase_Activity__c`
* Renewal Path `FCORE_MEM__Renewal_Path__c`
* Subscription Plan `FCORE_MEM__Subscription_Plan__c`
* Stripe API Log `FCORE_PSTRIPE__Stripe_API_Log__c`
* Wallet Item `FCORE_PAY__Wallet_Item__c`
In **Setup**, select **Object Manager**. Click the label of the relevant object (for example, **Account**). Object Manager has its own **Quick Find** box near the top-right corner that you can use to search for an object by name.
In the left panel, click **Page Layouts**, then click **Page Layout Assignments** and click **Edit Assignment**. For each record type, select the column and apply the appropriate layout, then click **Save**.
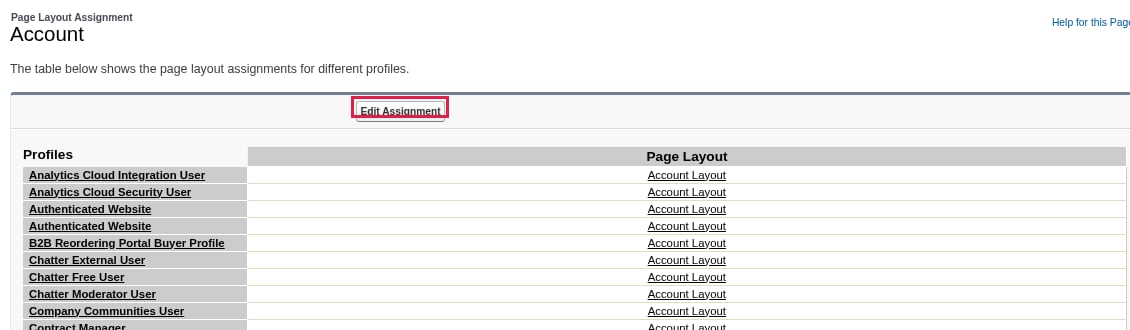 In the left panel, click **Compact Layouts**, then click **Compact Layout Assignment** and click **Edit Assignment**. Select the row or column, assign the appropriate layout, then click **Save**.
If you need to update the page layouts, see [this Salesforce article](https://help.salesforce.com/s/articleView?id=platform.customize_layoutcustomize_pd.htm\&type=5) on the enhanced page layout editor.
### Schedule Batch Jobs
Verify that the fusionCore batch jobs are scheduled. See [Scheduled Jobs in fusionCore](/end-user-guides/platform-setup/scheduled-jobs-in-fusioncore).
### Set Up Stripe
If you collect payments through Stripe, complete the Stripe setup.
If you are configuring a connected account Stripe connection, see [Setting Up a Stripe Account Overview](/end-user-guides/stripe/setting-up-a-stripe-account/index) and [Stripe Connected Account Link](/end-user-guides/stripe/setting-up-a-stripe-account/stripe-connected-account-link/index)
If you are configuring a direct account Stripe connection, see [Stripe Direct Accounts Overview](/end-user-guides/stripe/stripe-direct-accounts/index) and [Stripe Direct Accounts Email Template](/end-user-guides/stripe/stripe-direct-accounts/stripe-direct-accounts-email-template)
### **Ensure that Financial Period reports have been set up**
See [Financial Period Reports](/end-user-guides/accounting/financial-periods/financial-period-reports)
## **Notes for installing fusionCore**
* **Installs can take awhile.** A package install takes a few minutes and you may receive a message saying that the install is taking a long time and to check back later. This is especially common if you are installing a larger package such as Commerce or Subscriptions. Open **Deployment Status** in **Setup** to track your package installation progress. If an install fails, it will be reflected on the Deployment Status UI. The running user will also receive an email notification
* **Layouts changes may not appear right away.** If "Enable secure and persistent browser caching to improve performance" is turned on in **Session Settings** under **Setup**, an assigned layout or changes to a layout may take a few minutes to appear in the Salesforce UI because of caching. **Disable this setting** if you want the UI to reflect changes faster.
**Examples of the above steps:**
1. [Country/Territory Change](https://drive.google.com/file/d/13U0J5a0B-qVXKT7g2fb5x1r4DAwPcDfd/view?usp=drive_link)
2. [Changelist](https://drive.google.com/file/d/1OJjzIUNe9cq6R99TF1Ip1qxOv3dmUSuA/view?usp=drive_link)
3. [Alerts when Country/Territory/State is updated](https://drive.google.com/file/d/1Tio8YG9oAluLnB0819y7jmFX2AWDxE-A/view?usp=drive_link)
4. [RecordType Layouts](https://drive.google.com/file/d/18ciulRw8agxsDbC9EpMBTP7byR-G7S4T/view?usp=drive_link)
5. [Compact Layout Assignment](https://drive.google.com/file/d/1E004-BKCECU7dPkW6AlvNCcuspeKh8S9/view?usp=drive_link)
In the left panel, click **Compact Layouts**, then click **Compact Layout Assignment** and click **Edit Assignment**. Select the row or column, assign the appropriate layout, then click **Save**.
If you need to update the page layouts, see [this Salesforce article](https://help.salesforce.com/s/articleView?id=platform.customize_layoutcustomize_pd.htm\&type=5) on the enhanced page layout editor.
### Schedule Batch Jobs
Verify that the fusionCore batch jobs are scheduled. See [Scheduled Jobs in fusionCore](/end-user-guides/platform-setup/scheduled-jobs-in-fusioncore).
### Set Up Stripe
If you collect payments through Stripe, complete the Stripe setup.
If you are configuring a connected account Stripe connection, see [Setting Up a Stripe Account Overview](/end-user-guides/stripe/setting-up-a-stripe-account/index) and [Stripe Connected Account Link](/end-user-guides/stripe/setting-up-a-stripe-account/stripe-connected-account-link/index)
If you are configuring a direct account Stripe connection, see [Stripe Direct Accounts Overview](/end-user-guides/stripe/stripe-direct-accounts/index) and [Stripe Direct Accounts Email Template](/end-user-guides/stripe/stripe-direct-accounts/stripe-direct-accounts-email-template)
### **Ensure that Financial Period reports have been set up**
See [Financial Period Reports](/end-user-guides/accounting/financial-periods/financial-period-reports)
## **Notes for installing fusionCore**
* **Installs can take awhile.** A package install takes a few minutes and you may receive a message saying that the install is taking a long time and to check back later. This is especially common if you are installing a larger package such as Commerce or Subscriptions. Open **Deployment Status** in **Setup** to track your package installation progress. If an install fails, it will be reflected on the Deployment Status UI. The running user will also receive an email notification
* **Layouts changes may not appear right away.** If "Enable secure and persistent browser caching to improve performance" is turned on in **Session Settings** under **Setup**, an assigned layout or changes to a layout may take a few minutes to appear in the Salesforce UI because of caching. **Disable this setting** if you want the UI to reflect changes faster.
**Examples of the above steps:**
1. [Country/Territory Change](https://drive.google.com/file/d/13U0J5a0B-qVXKT7g2fb5x1r4DAwPcDfd/view?usp=drive_link)
2. [Changelist](https://drive.google.com/file/d/1OJjzIUNe9cq6R99TF1Ip1qxOv3dmUSuA/view?usp=drive_link)
3. [Alerts when Country/Territory/State is updated](https://drive.google.com/file/d/1Tio8YG9oAluLnB0819y7jmFX2AWDxE-A/view?usp=drive_link)
4. [RecordType Layouts](https://drive.google.com/file/d/18ciulRw8agxsDbC9EpMBTP7byR-G7S4T/view?usp=drive_link)
5. [Compact Layout Assignment](https://drive.google.com/file/d/1E004-BKCECU7dPkW6AlvNCcuspeKh8S9/view?usp=drive_link)